Transfer customer from one reseller to another
Adobe customers can switch to a different reseller and continue with the new reseller to manage their subscriptions and orders. This process, known as reseller change, allows customer organization administrators to initiate the transfer through the Adobe Admin Console by generating an approval code, which is then used by the new reseller to authorize the transfer. This section outlines the steps and requirements for transferring customers between resellers.
Limitations
From Adobe’s guidelines:
- Reseller transfer is only supported for customers on VIPMP. Customers on VIP must first migrate to VIPMP before proceeding.
- Transfer is not permitted for orders within the 14-day return window.
- Reseller transfer must occur within the same geographic region.
- Testing of Distributor-to-Distributor transfers cannot be done on Sandbox accounts and must be conducted directly on Production.
Prerequisites
Before initiating a transfer:
- Ensure that you have enough time to execute the transfer, as the approval code is valid for 72 hours after a customer clicks the Generate Code on the Adobe Admin Console.
- Contact your AppDirect technical representative to enable the required functionalities.
- Ensure the new reseller company is registered on the Marketplace and has an external identifier set.
To transfer customer from one reseller to another
📝 Note: If the AppDirect logo appears in the upper-left corner of the page, when Manage > Marketplace appears in this topic, click the grid icon > Switch to | Store, instead.
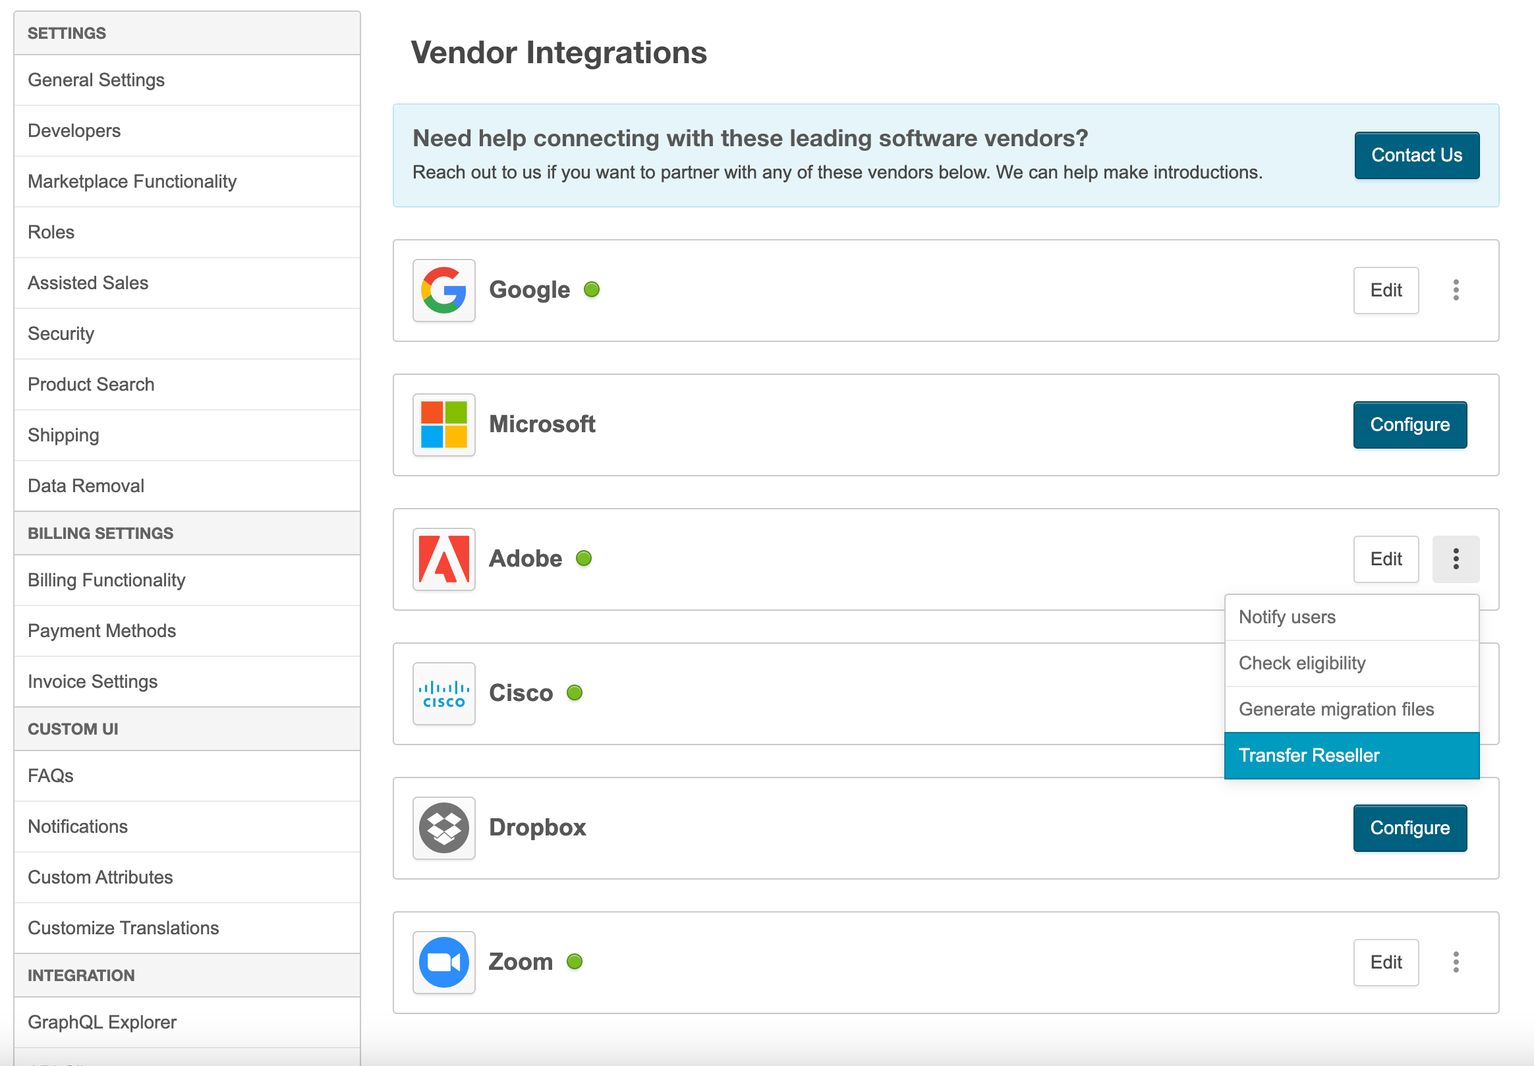
- Go to Manage > Marketplace > Settings > INTEGRATION | Vendor Integrations.

- Click on the three-dot menu next to Adobe and select Transfer Reseller from the dropdown.
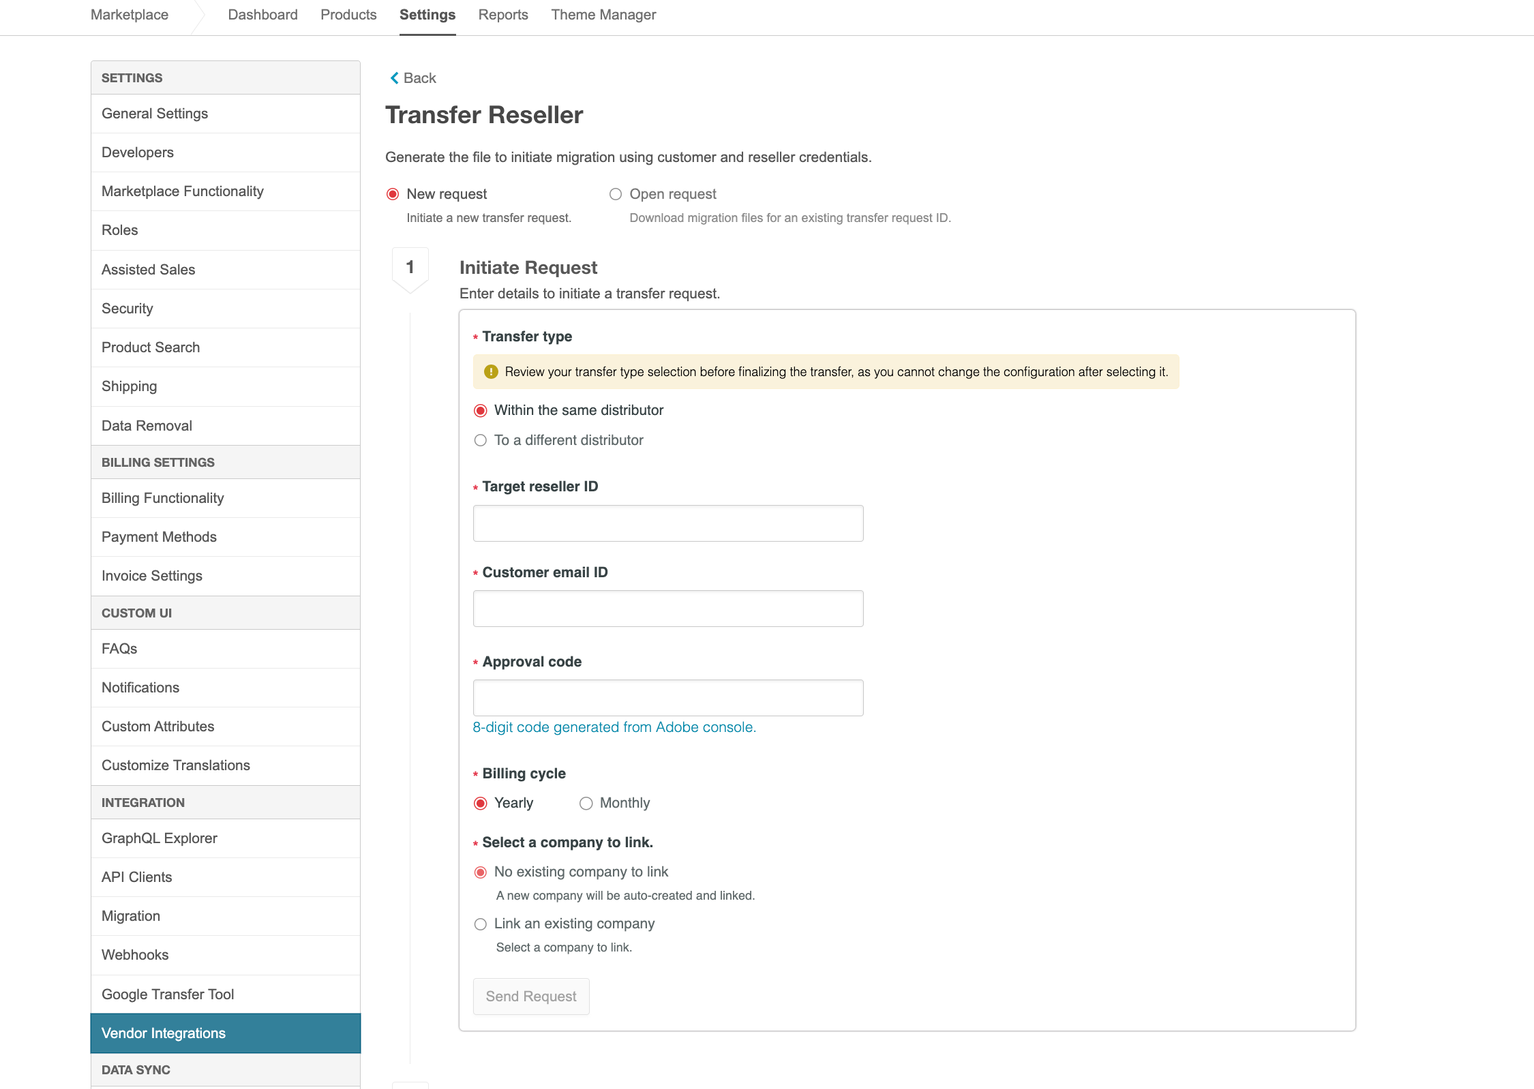
The Transfer Reseller page opens with the option to initiate a new request. It has three sections - Initiate Request, Download Files, and Initiate Migration.

-
Fill in the required details in the Initiate Request section.
- Select the Transfer Type.
- Within the same distributor
Transferring from one reseller to another under the same distributor. - To a different distributor
Transferring from one reseller to another under two different distributors.
- Within the same distributor
- Enter the Target reseller ID (reseller ID of the reseller to which the customer is being transferred).
- Provide the Customer email ID.
- Enter the 8-digit approval code generated by the customer in the Adobe Admin Console.
Refer to the How can a customer generate an approval code? section for instructions on generating an 8-digit approval code. The section contains Adobe's instructions at the time of release. As this process is managed by Adobe, refer to their latest documentation or contact your Adobe CAM for support if the information seems outdated. - Select the Billing cycle as Yearly or Monthly based on the customer's agreement.
- Select the appropriate linking option:
📝 Note: You must select this option only if a company already exists in the marketplace. Ensure that you choose the company associated with an Adobe account while linking.
Incorrect selection may lead to discrepancies.
- No existing company to link
A new company will be auto-created and linked. - Link to an existing company
Links customers to an existing company.
📝 Note: Ensure that this company has an external identifier set before proceeding. Refer to How to set a company’s external identifier?
- Click Send Request to transfer the customer to the target reseller ID and generate migration files.
A confirmation message appears with the request ID. Note this request ID for future reference.
📝 Note: The platform enables the Download files button after the process is complete.
- Select the Transfer Type.
-
Click Download Files.
📝 Note: Unzip the downloaded compressed file and verify the contents of the files before proceeding with the actual migration.
❗ Important If the ‘COMPANY_EXTERNAL_ID’ column is empty in the RSSR_ASSOCIATIONS file, it indicates that a company associated with an Adobe account exists on the marketplace and was not chosen during the transfer process. Ensure that you set the company’s external identifier and populate it in the column before proceeding with the migration.
- Click Initiate Migration.
The platform redirects you to the Data Migration page, where you can upload the generated files and perform the migration.
Note: When you click Initiate Migration, you will be redirected to the generic migration
utility.
- If the selected Transfer type is Within the same distributor, irrespective of the selection in Company linking, and if a company exists with an associated Adobe account, the platform generates only the RSSR Association file. To perform migration, you must upload and migrate the RSSR_ASSOCIATIONS file.
- Irrespective of the Transfer type, if No existing company to link is selected, you must follow the below steps to perform the migration:
- First upload and migrate USERS, COMPANIES, and MEMBERSHIP files together.
- Upload and migrate the DEVELOPER_CUSTOMER_ACCOUNTS and RSSR_ASSOCIATIONS files.
- Upload and migrate the ENTITLEMENTS and USER_ENTITLEMENTS files.
- Irrespective of the Transfer type, if Link to an existing company is selected, you must follow the below steps to perform the migration:
- First upload and migrate USERS and MEMBERSHIP files together.
- Upload and migrate the DEVELOPER_CUSTOMER_ACCOUNTS and RSSR_ASSOCIATIONS files.
- Upload and migrate the ENTITLEMENTS and USER_ENTITLEMENTS files.
- (Optional) If for any reason, your session times out and you are unable to download the migration file, click Open request and input the request ID generated in step 3 to download the file.
Understand the migration files
The above process generates a compressed (.zip) file that contains the migration files listed below:
- USERS.csv - Contains information about the users to be migrated to your marketplace.
- COMPANIES.csv - Contains the information about the companies to be migrated to your marketplace.
- MEMBERSHIP.csv - Contains the information about the memberships to be migrated to your marketplace.
- DEVELOPER_CUSTOMER_ACCOUNTS.csv - Contains the information about the Adobe empty console customer accounts to be migrated to your marketplace.
- ENTITLEMENTS.csv - Contains the information about the Company Entitlement to be migrated to your marketplace.
- USER_ENTITLEMENTS.csv - Contains a company entitlement to user entitlement relation for migrated orders to assign apps to users on your marketplace.
- RSSR_ASSOCIATIONS.csv - Contains the information about the Reseller Association to be migrated to your marketplace.
Frequently Asked Questions (FAQs)
Have more questions about the reseller change? This section provides answers to some of the commonly asked questions related to the reseller change.
Where can I find the request ID for downloading migration files?
When a user initiates the transfer request, a request ID gets generated and displayed on the UI. You can note it down for future reference.
Appendix
How to set a company’s external identifier?
To set a company’s external identifier, follow the steps below:
- Create a CSV file with headers EXTERNAL_ID and AD_INTERNAL_ID. Example -
EXTERNAL_ID: unique new_external_id
AD_INTERNAL_ID: company_uuid - Upload the CSV file:
- Go to SuperUser > Marketplace Settings > Migrations.
- Select the partner and upload the CSV file in the Companies file section.
- Select Update Company External IDs.
How can a customer generate an approval code?
📝 Note: The section contains Adobe's instructions at the time of release. As this process is managed by Adobe, refer to their latest documentation or contact your Adobe CAM for support if the information seems outdated.
Reseller Change is a customer-initiated process where a customer organization administrator:
- Log in to the Adobe Admin Console.
- Navigate to the Account tab to locate the current reseller Account Manager.
- Click the view button next to the Account Manager name.
A dialog box opens showing Reseller and Distributor details. - Click the edit button next to the view button and then click Generate Code to generate an 8-digit approval code.
- Share the code with the new reseller for authorization within 72 hours.
Was this page helpful?
Tell us more…
Help us improve our content. Responses are anonymous.
Thanks
We appreciate your feedback!