Edit recurring revenue model pricing
Different pricing configuration options are available for each revenue model (free, one-time, recurring, and tiered). This page explains how to configure pricing for the recurring revenue model. For descriptions of all the revenue models, see Edit revenue models.
To edit recurring revenue model pricing
- If you are not already on the Manage Add-On Pricing page, go to Manage > Billing and Distribution > Products > Product name | Edit > Connections & Pricing | Pricing. The Manage Add-on Pricing page opens for the selected add-on product.
- If you have not already done so, from the Revenue Model drop-down list, select Recurring. The Recurring Price section appears. The following configuration sections are displayed in the Payment Plans area:
- Free trial period and Expired free trial grace period
- Flat rate price
- Price per unit
- Usage restrictions
- Dependent setup fee
- Setup fee
- Contracts
- In the Pricing Plan section, from the Billing Frequency drop-down list, choose one of the available options. The price(s) you configure in the sections below will be invoiced to the customer at this frequency.
- Determine which one of the following price options you want to configure for this add-on:
- Flat Rate Price—The add-on is sold to customers for a flat fee charged at a set frequency. When customers purchase the add-on, quantity is not applicable (they purchase an implicit quantity of one). For example, $5.00 per month for the add-on.
- Price Per Unit—The add-on is sold to customers at a recurring price per custom-defined unit (for example, megabytes or users) and customers specify how many units they wish to purchase. For example, a customer who selects an extra storage add-on may choose a quantity of 5 megabytes at a price of $5.00 per megabyte per month.
- Price and Usage Ranges/Restrictions—Instead of the simple Price Per Unit configuration, customers buy the add-on at a price that differs depending on the quantity they purchase. These prices are configured with quantity ranges. For example, $1.00 per megabyte per month when a quantity within the range of 5 to 100 megabytes is purchased, and $0.50 per megabyte per month when more than 100 megabytes are purchased. You can configure an unlimited number of these ranges. Note that with this example, the minimum value in the first range limits customers to purchases of 5 megabytes or more.
Proceed to one of the next three steps, depending on your choice.
- (Optional) Configure flat rate price:
- If the Flat Rate Price section is not visible, click Add a Flat Rate Price. The section appears.
- Enter the flat Price per Billing frequency.
If the Marketplace Manager configured more than one currency, there is a box for each currency. Enter the amount in each box, based on applicable conversion rates. - Proceed to Step 12.
- (Optional) Configure price per unit:
- If the Price per Unit section is not open, click Add Price per Unit. The Price Per Unit area appears.
- Define the unit type. The default is set as Users, but you can change this to meet your needs. Many unit types are preconfigured, including megabytes, gigabytes, contracts, boxes, data points, and others. To search for the unit type you need, start typing the unit type name in the per field. Options autopopulate.
📝 Note The unit type you select here is used for the remaining configuration in the Price Per Unit section.
-
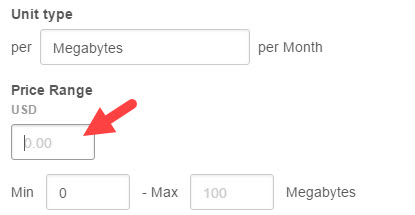
Enter the recurring per-unit price to charge per configured unit type.
If the Marketplace Manager configured more than one currency, there is a box for each currency. Enter the amount in each box, based on applicable conversion rates. -
Proceed to Step 10.
-
(Optional) Configure price and usage ranges:
- If the Price per Unit section is not open, click Add Price per Unit. The Price Per Unit area appears.
- Define the unit type. The default is set as Users, but you can change this to meet your needs. Many unit types are predefined, including megabytes, gigabytes, contracts, boxes, data points, and others. To search for the unit type you need, start typing the unit type name in the per field, and options autopopulate.
The unit type you select here is the unit used for the remaining configuration in the Price Per Unit section. - To configure the price per unit for the range, in the box that appears below the currency type, enter the amount per unit for this quantity range (you define the Min and Max of this range in the next step).
If the Marketplace Manager configured more than one currency, there is a box for each currency. Enter the amount in each box, based on applicable conversion rates.

-
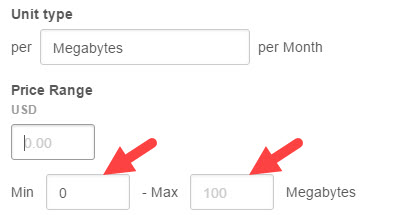
(Optional) To define the minimum and maximum number of units for this range, in the Min and Max fields, enter the quantity range to which this per unit price (configured in the previous step) applies.
- For example, 1-100. This means that the user pays the price indicated in the currency type box above for each of the first 100 megabytes. If the minimum number of megabytes that can be purchased is 5 and this rate is applicable to a maximum of 100 users, the first range is entered as 5-100.
- One or more ranges can be configured. The minimum for the next usage range must be the same number as the maximum for the previous usage range. This applies for all subsequent usage ranges that you add.

-
(Optional) To add another range, click Add another usage range and repeat the previous two steps.
-
(Optional) Configure the following settings:
- Restrict purchases to increments of—Enter a value. You can also accept the default of 1.
Users buy the product in specific increments. When you select this option, the input field for customers is converted to a drop-down list. For example, the customer might see a drop-down list of 5, 10, 15, and 20 units. - **Display price per increment—**To enable, select the checkbox and set the minimum quantity to purchase to match the increment. Or, leave the checkbox cleared (the default state) to leave it disabled.
When enabled, this changes the display on the product Pricing & Editions page to reflect the cost based on the minimum number of required units, instead of the price per individual unit. For example, if you set a minimum of 5, and an increment of 5, at $1/user per month, the customer sees a price of $5/5 users per month instead of the normal $1/user per month.
- Restrict purchases to increments of—Enter a value. You can also accept the default of 1.
-
(Optional) If you configure two or more usage ranges, an additional field appears: Keep pricing tier with volume. Select it to enable the option. You can also accept the default which leaves it disabled.
Note: In this case, tier refers to a usage price range.
To understand this option, consider this example: Price ranges are configured as follows: For the first 1-10,000 API calls, the price is set at $0 per call, and every call above 10,000 is charged at 10 cents.- Checkbox selected—For the first 10,000 API calls, the user is charged $0. However, after the 10,000 call threshold is passed, the user is charged $.10 for every call reported during the billing period, including the first 10,000. So for 10,001 calls, the user is charged $10,001 X $0.10, for a total charge of $1000.10.
- Checkbox cleared—There is no charge for the first 10,000 API calls. For each API call above the 10,000 threshold, those additional calls are charged at $.10 per call. Therefore, for 10,001 calls, the user is charged $.10.
-
(Optional) Configure the Price Per Unit settings.
-
To enable metered usage for this unit type, turn on Metered usage. For example, $5/user based on usage.
-
To enable a setup fee per unitType, turn this option on. An additional fee per unit is applied to each unit purchased during the first checkout. For example, a $50 setup fee for each unit.
-
(Optional) Configure another usage rate:
-
Click Include another usage rate. A new Price Per Unit section appears.
-
Repeat step 7 to configure the new usage rate.
-
(Optional) Click Add a Setup Fee to activate this optional feature. The Setup Fee section appears. Enter a value. If the Marketplace Manager configured more than one currency, there is a box for each currency. Enter the amount in each box, based on applicable conversion rates.
This fee is only due at the first checkout and is not billed again. Purchases of additional quantities do not incur this fee. If customers cancel and repurchase the add-on, they are charged the setup fee again. -
(Optional) To enable this feature, click Add Contract Terms to display the contract fields. For more information on contracts, see Contracts.
-
(Optional) Select Issue partial credit upon cancellation checkbox to generate a prorated credit on active subscription cancellation. The platform automatically applies the credit to the next recurring invoice.
-
(Optional) Configure usage settings at the bottom of the Recurring Price area, as required. These include:
- Allow custom metered usage—When enabled, the developer can charge the user for custom metered usage
- Separate pre-paid order—If metered (postpaid) usage is enabled, this option is available. Enable this to split metered usage billing from prepaid billing. When enabled, separate orders are created for metered and prepaid billing, as are separate invoices: one invoice is generated for pre-paid charges at the beginning of the billing period and another is generated for the metered usage immediately after the billing period ends.
By default, this option is disabled and all items on an order (pre-paid and post-paid) appear on one invoice which is generated at the end of a billing period. - Keep billing cycle on usage change—When enabled, the order is put on the same billing cycle. Upon activation, the user pays the prorated amount for the remaining time in the current billing cycle and then pays the full amount at the start of the next billing cycle. For example, if a customer already purchased 5 users at $1/ month and upgrades half-way through the month to 15 users, they owe $5 at the time of upgrade (half of the 10 users) and pay $15 at the start of the next billing cycle.
- Click Save Plan to save this configuration. A message confirms that the configuration is saved.
- Complete the procedure described in Edit included items.
Was this page helpful?
Tell us more…
Help us improve our content. Responses are anonymous.
Thanks
We appreciate your feedback!