Create the Reseller ID custom attribute
This topic describes a best practice for creating a Reseller ID custom attribute. While the feature was designed to give Marketplace Managers the flexibility to create and name custom attributes using whatever conventions make sense for their organization, this procedure specifies a single naming convention. When the naming convention is implemented, Developers represented by reseller companies that work on multiple AppDirect-powered marketplaces can track orders from multiple marketplaces.
Even if this reseller-on-multiple-marketplaces scenario does not describe your current marketplace implementation, realize that it may in the future. Using the naming convention specified in this procedure ensures compatibility if the scenario applies at a future date.
In general, the Marketplace Manager configures a company-level custom attribute field with an API key of reseller-id, and Developers configure their API integrations to capture the value of this reseller-id field.
Consider the following use case:
- A Developer works with two different reseller companies on two different marketplaces: Reseller A and Reseller B. Each reseller receives an ISV-generated reseller ID. Reseller A receives 1A1A1A, and Reseller B receives 2B2B2B.
- The Marketplace Manager of each marketplace creates a company-level custom attribute called reseller-id.
- When representatives from either Reseller A or Reseller B make a purchase on behalf of a customer, they enter their reseller ID (either 1A1A1A or 2B2B2B) in the Reseller ID field on the Additional Information page in the purchase flow.
- This reseller-id custom attribute is included in the API call that creates the order. Developers can retrieve this ID to report on resellers and their orders.
To create the reseller-id custom attribute
📝 Note: If the AppDirect logo appears in the upper-left corner of the page, when Manage > Marketplace appears in this topic, click the grid icon > Switch to | Store, instead.
-
Go to Manage > Marketplace > Settings > Custom UI | Custom Attributes. The Custom Attributes page opens.
-
Click Add Custom Attribute above the Company Custom Attributes table. The Add Company Custom Attribute page opens.
-
Enter the following attribute data information in the corresponding field:
- Key—reseller-id (this must match exactly: all lower case letters and a hyphen).
- Label—Reseller ID.
- Hint—Reseller IDs are issued by a Developer to a Reseller to track sales made by the Reseller on behalf of the Developer.
-
Click Select a location. The Select a location drop-down list appears.
-
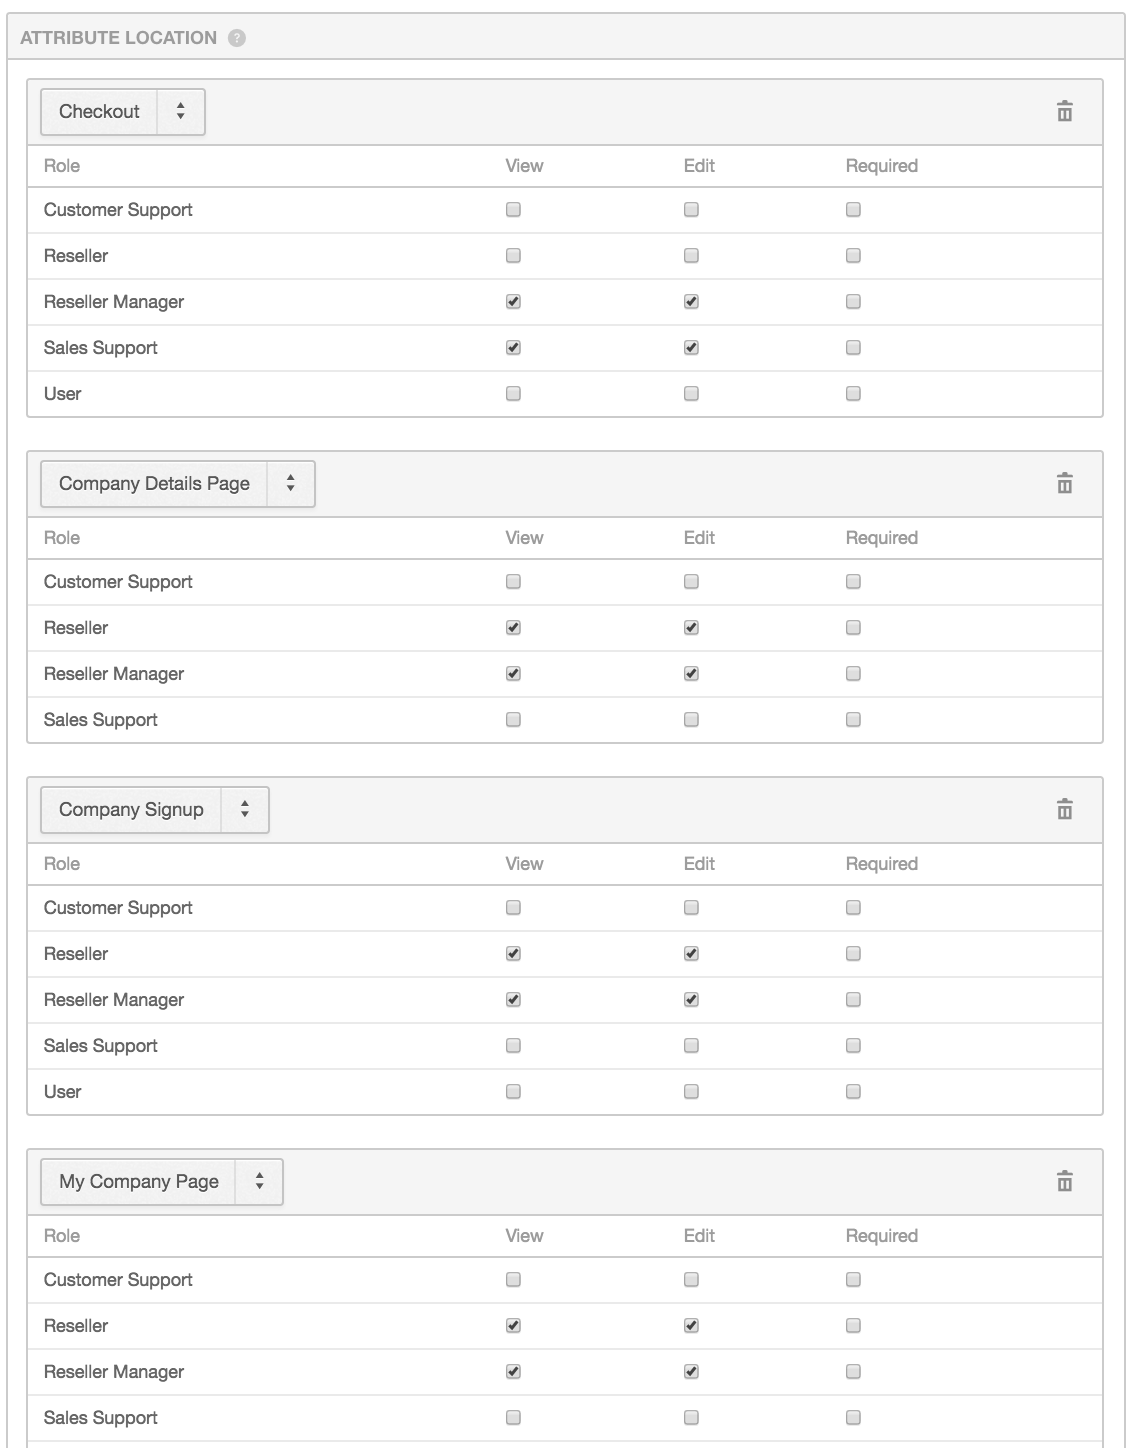
Click the Select a location drop-down list, then select the following locations:
-
Checkout (Additional Information and Confirm Order pages)
-
Company Details page
-
Company Signup
-
My Company page
-
Order Details modal
The Role section appears and displays the roles available for each attribute location as shown in the following image (the Order details modal section is not shown):

Note: The Marketplace Manager role is not included in any Role section, but has View and Edit rights for all custom attribute fields. Marketplace Managers are never required to make entries in custom attribute fields.
-
-
Select the View and Edit checkboxes next to Reseller and Reseller Manager for each location.
-
Click Save Changes. The Reseller ID custom attribute field is created in the specified locations.
For information about using APIs to view the reseller-id attribute values, see Retrieve the Reseller ID custom attribute.
Was this page helpful?
Tell us more…
Help us improve our content. Responses are anonymous.
Thanks
We appreciate your feedback!