Edit user information
From the user details page, you can edit a user's information.
To edit user information
- Go to Manage > Account > Users > {User Name}. The user's profile page opens, with four tabs:
- Profile (default tab)
- Groups
- Applications
- Settings
The following steps describe each of these tabs.
- (Optional) View the Profile tab, where you can see information about the user, including background, roles and other basic user information. The information on this tab reflects user configurations made by both the users themselves (for example, address, photo and other details) and by you as the Company Administrator (for example, if you add a new role under Settings, it is reflected here). Accordingly, user information on this tab can only be viewed, not edited.
- (Optional) Click the Groups tab, where you can view a list of all of the groups to which the user belongs. From this tab you can perform one of the following tasks:
- Add the user to a group, using the following procedure.
- Click Manage Groups. This opens the Manage Groups page, with a list of all existing groups that you manage.
- Click the name of the group to which you want to add the user. This opens a page listing all current group users.
- Click Manage Users. The Add Users page for this group opens. The left pane displays the names of all users that you manage that are not yet part of this group. Click the name of the user or users that you want to add to the group. This adds their name to the group list in the right pane. You can also remove one or more users from the group by clicking their name in the right pane.
- Remove the user from a group, using the following procedure.
- Go to the Group tabs. If the user belongs to more than one group, click the name of the group from which you want to remove the user. This opens the group users page.
- Find the user's name in the list on the right side, click the the gear icon, then click Remove User.
- Add the user to a group, using the following procedure.
- (Optional) Assign applications to the user. On the Applications tab you can view all applications assigned to the user, along with the user's status in relation to each application, the date each application was assigned to the user, the application's owner, and the number of users. The procedure you use to edit the user's applications depends on whether you are assigning a new application or managing an existing application. A description follows for both processes.
- Assign an application to the user
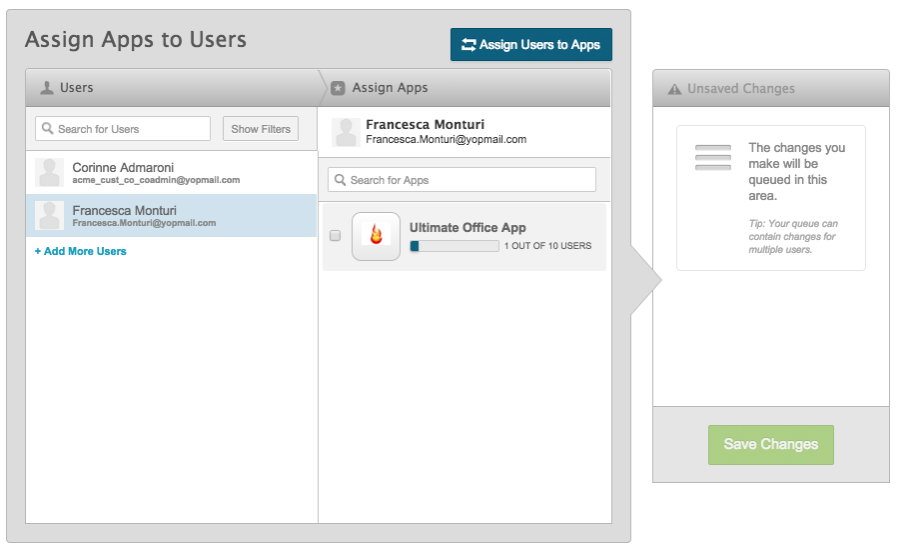
- Click Assign Apps. This opens the Assign Apps to Users page. Users that do not yet have the application assigned to them are listed on the left side, and available applications are listed on the right side. (Please note that if you click Assign Apps to Users on this page, the display is reversed. In that case, the process described below would be completed in reverse).
- Click the user for whom you want to assign applications. The list of applications appears.

- Enter a checkmark for the application (or applications) you want to assign to the user.
- Click Save Changes. The application assignment is completed.
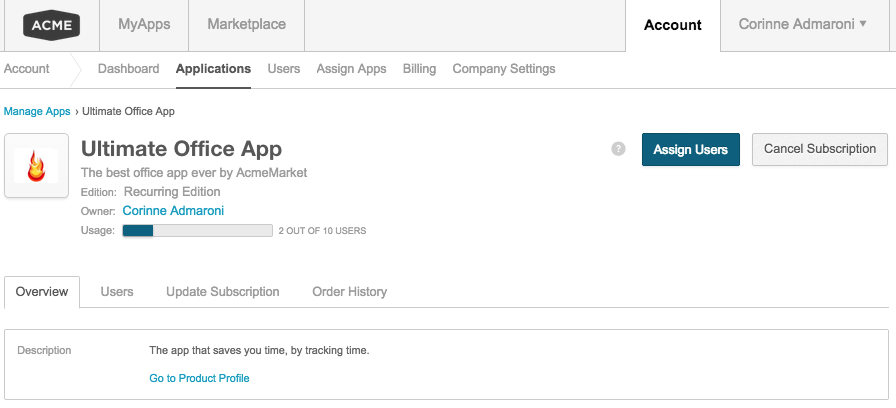
- Make changes to an existing subscription. In the user's Applications tab, Click the name of the application for which you want to make changes. This takes you the Manage Apps page for that application.
This page has four tabs where you can view and manage the subscription. A description of each tab follows the image.

- Overview—A description of the application. Click Go to product profile to learn more about the application. You can also manage the application from that page.
- Users—A list of all current users of this application. From here you can cancel the subscription or assign users.
- Update Subscription—Details of the subscription, including: available editions, included users, price and other details. Here you can change the subscription (upgrade or downgrade), change the number of users, and take other actions depending on the options displayed. Please note that some changes may be limited by contractual obligations. For example in some cases a service cannot be downgraded.
- Order History—A view of changes made to the subscription over time.
- Assign an application to the user
- (Optional) Click the Settings tab to view and manage the roles assigned to the user.
- The User role is automatically assigned to all system users and cannot be removed. Other roles may also be assigned by default in some cases—for example, if users are assigned the Company Administrator role, they are also automatically assigned the Billing Administrator role, and that role is displayed in gray, indicating that it cannot be changed.
- For any role that can be modified, add a checkmark to add the role to the user's permissions, or uncheck the box to remove permissions
📝 Note: If your organization is using 2-step verification, the user’s parameters are also displayed on this page.
Was this page helpful?
Tell us more…
Help us improve our content. Responses are anonymous.
Thanks
We appreciate your feedback!