Create and publish products in bulk
As a Marketplace Manager, you can bulk-create and upload digital and physical products with to the Staging Catalog of a marketplace using Product Uploader. Use the CSV file to add information about your products and their variants before uploading them to the marketplace. The information in this CSV file is used to build product data in the catalogs.
Common required fields for product creation:
- Product identifier (SKU or unique ID)
- Product name/title
- Product type
- Pricing information
- Status
📝 Note: Required fields vary by product type. Always download the latest template to ensure you have the correct structure.
To create products in bulk
-
Log in to your AppDirect marketplace
-
Navigate to Products > CATALOG | Manage product catalogs
-
Click Product uploader
-
Click the Try New Experience button.
The new Product Uploader page opens. -
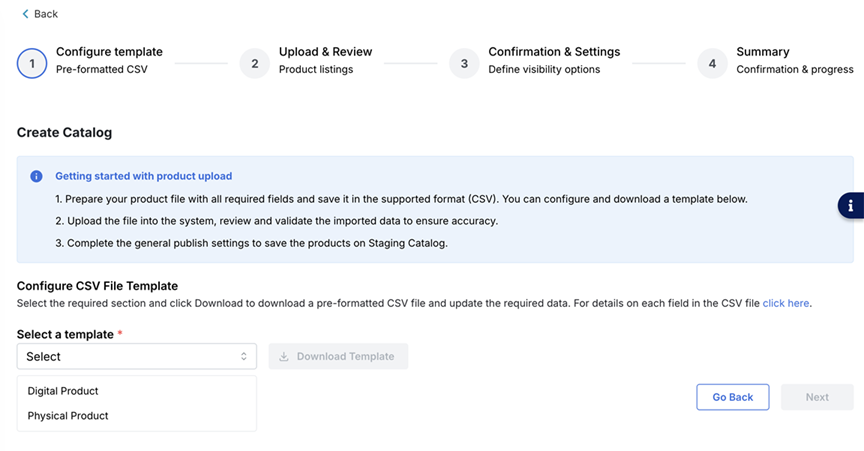
Click the Create Catalog tile. The create catalog workflow opens.
-
Complete the following steps:
Prepare your CSV file
- From the Select a section drop down, select the product template for Digital or Physical products.
- Click Download Template to download the selected product template CSV file that you can use to add your product information.
📝 Note: Click click here to download an .XLSX file that contains instructions on how to use the template to create and update product information. It also covers the fields in the template, the correct formats to use, and which ones are mandatory.
- Click Next.
Upload your file
- Click Upload File.
Upload CSV File dialog box opens. - Upload your CSV file by either dragging and dropping the file in the provided space or click Upload File and select the required file.
- Review the file preview if available.
Validate your data
📝 Note: The system automatically validates your file. Validation includes:
- Data Types: Ensures correct data types (numbers, dates, etc.)
- Required Fields: Checks if all mandatory fields are populated, missing mandatory fields, and data type errors.
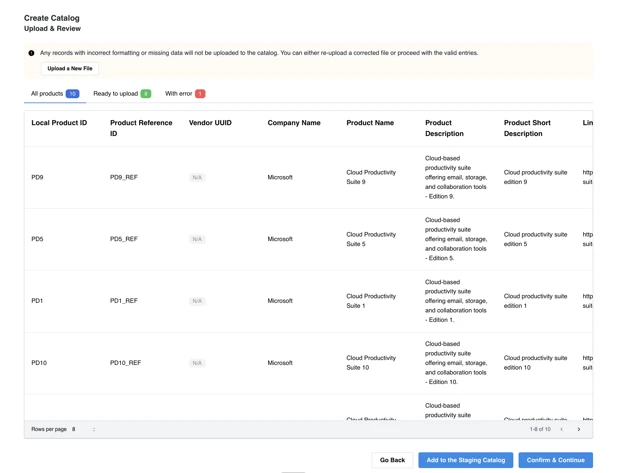
- Review any errors or warnings displayed.
- Fix issues and click Upload a New File to re-upload the corrected file if necessary.
Publish your catalog
- After you verify your data, choose if catalogs needs to be published or added to staging. In the Upload & Review step select one of the following:
- Add to the Staging Catalog - Choose this option if catalog needs to be added only to the staging catalog.
- Confirm & Continue - Choose this option if catalog needs to be published to Production catalog. If you select this option, the Configuration and Settings step opens with the default settings selected that will be applied to all the products being created.
- If you select Confirm and Continue in the previous step, then you have the following two options:
-
Keep existing settings - Choose this option to proceed with publishing the catalog which is already available in production catalog and retain the existing settings.
-
Publish and Continue - Choose this option to configure the settings and publish the catalog. This will overwrite the publish settings for all products in the batch. Use this option carefully while publishing existing production catalog. Configure the following settings as required:
-
In the PRODUCT VISIBILITY section define the network and marketplace visibility for the product:
-
The availability settings, Visible on network and Visible on marketplace, work in combination with each other. Key terms are defined as follows:
- Network - Marketplaces in a hierarchy, including a parent marketplace (also known as base marketplace) and one or more child marketplace.
- Visibility - Whether or not the product is visible to customers on the marketplace. When it is, they can purchase the product themselves.
The configuration combinations and outcomes for product visibility appear in the following table. However, regardless of the visibility configuration, Reseller Managers, Resellers, and Sales Support Representatives (SSRs) can always see products within the assisted sales flow and when they Purchase products on behalf of users, even when customers cannot see it.
Visible on Network Visible on Marketplace Product visibility Selected Selected The product is visible to customers on all marketplaces. This is the default configuration. Selected Cleared The product is visible to customers on the base marketplace but hidden by default on all child marketplaces. Marketplace Managers can configure the product to be visible or invisible on each child marketplace. Also, when Visible on Network is selected but Visible on Marketplace is not selected then, the word Invisible appears next to the product for Reseller Managers, Resellers, and SSRs using the assisted sales flow. This identifies it as a product that is not visible to customers on the marketplace. Cleared Cleared The product is hidden from customers on the base marketplace and all child marketplaces. 📝 Note: Clearing Visible on Network automatically disables Visible on Marketplace.
-
Select Show as "Coming Soon" on marketplace to promote a new product you intend to add to your marketplace.
-
Select Hide all pricing on the marketplace including the pricing tab in product profiles if you want to hide the pricing tab from customers.
-
-
In the PURCHASES section define whether you want the product to be visible to Resellers.
- Select Resellers can start new purchases to define if the product must be visible to Resellers. Unselect this option to prevent Resellers from selling the product. This setting also:
- Allows Reseller Managers to add the product to reseller catalogs.
- Makes the product available to resellers who can sell products. When the product is available, Resellers can start a checkout purchase or create an opportunity with a product.
- The following are not affected by this setting:
- Reseller Managers and Marketplace Managers can add products to reseller opportunities.
- Resellers can submit and finalize opportunities containing a product.
- Resellers can make subscription updates for the product.
- (Optional) Select End users purchase with Checkout V2. This option is only available if Checkout V2 is enabled by AppDirect for your marketplace, but a Marketplace Manager has disabled it for all purchases. If you enable this setting, all customers who purchase this product on your marketplace go through the Checkout V2 flow. See Configure checkout settings for more information.
- Select Resellers can start new purchases to define if the product must be visible to Resellers. Unselect this option to prevent Resellers from selling the product. This setting also:
-
In the LEADS section define how to collect or assign leads.
- Select Collect Leads to have this product's profile page display a Contact Us button. Potential customers click this button to submit contact information that your sales agent can use to contact the customer.
- Select Assign collected leads to Developers to automatically assign leads that users submit from the product profile to the product's Developers, and Resellers that belong to the same company. Note that to enable this setting, you must select the Collect Leads setting, too.
-
In the SORTING section, assign a sorting rank (Very High, High, Medium, Low, or Very Low) to the product from the drop-down list. Products with a higher ranking appear closer to the top of the home page, search results, and in the Featured Apps slider.
If more than one product has the same sorting rank, the platform uses the following logic to automatically sort them:- On the home page - The home page displays the product in the same order as the configuration sequence. For example, Product A and Product B have the same sort rank. You configured Product A’s sorting rank, and then configured Product B’s sorting rank. Product A appears in the Featured Applications and All Applications pages first, then Product B follows.
- In the search results - Search results display the product that most closely matches the search string entered by the customer. For example, two products (Product A and Product B) have the same sort rank. You configured Product A’s sorting rank, and then configured Product B’s sorting rank. If the customer enters A in the search field, Product A appears first in the search results. If the customer enters Product in the search field, Product A appears first, then Product B follows.
-
Click Publish and Continue.
-
-
-
The create catalog workflow is successfully completed, with a request ID. Click the Go to Activity Log button or navigate to Activity log page from the home page to monitor the progress.
Was this page helpful?
Tell us more…
Help us improve our content. Responses are anonymous.
Thanks
We appreciate your feedback!