Assign applications to groups
There are circumstances in which a Company Administrator may want to assign applications to a group, rather to individual company users. For example:
- To assign applications to all members of a group—These can include office and productivity applications, time reporting, expense tools, and other applications that all members of the group require. With the Assign Applications to a Group feature, this can be done quickly. You can also unassign an application from a group using this feature.
- To automatically assign applications to new members of a group—When new members join a group, they are automatically assigned all of the applications assigned to the group, immediately upon joining the group. This allows you to save time and ensures new group members get rapid access to all the applications they need. Note that, while the application assignment is automatic in this case, new users only have access to those applications when they activate their account.
You can create additional groups based on similar roles, regions or other criteria. For example: Western Sales, Product Management, Corporate. To learn more about creating groups, see Create user groups. See Manage user group membership for information on adding or removing users from a group.
📝Note: Users who have applications assigned to them using the Assign Apps to Groups feature can also be assigned additional applications on an individual basis.
To assign applications to groups
-
Contact your AppDirect account representative to ensure that the Group Application Assignment feature is enabled.
-
Go to Manage > Account > Assign Apps > Groups
This opens the Assign Groups to Apps tab, which displays the list of groups that you manage in the left pane.💡 Tip: If you prefer to work with the reverse view, with applications listed in the left pane and groups on the right side, click Assign Apps to Groups.
-
Click the name of the group to which you want to assign applications. The list of available applications appears in the right pane.
-
To assign applications to groups, you can assign individual applications to a group, or you can assign applications in bulk—that is, you can assign or unassign all available applications in a single step.
-
Individual application assignment
Click the checkbox next to the application you want to assign to the group. You can assign (or unassign) more than one application by selecting multiple checkboxes.
If needed, you can manage application assignments for multiple groups. After you assign applications to one group, click the name of another group, then enter a checkmark next to the applications you want to assign to that group.

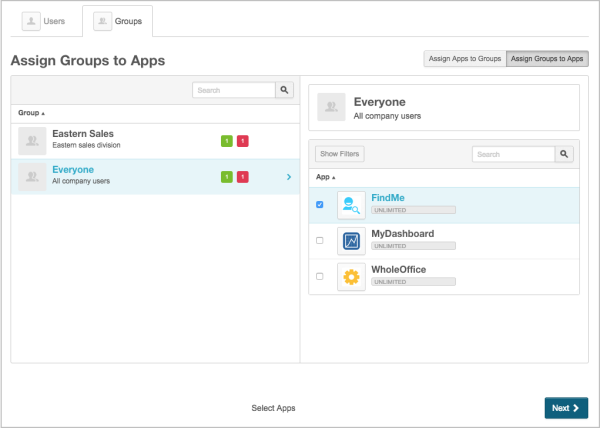
Note the following in the preceding image:
- Number of applications indicator—When you assign an application in the right pane to a selected group, a green box appears next to the group name, indicating the number of applications assigned to the group. If you unassign an application, a red box appears with a number indicating the number of applications that you are unassigning.
- For the group Eastern Sales, the My Dashboard application is now assigned, and WholeOffice is unassigned. These changes are not visible in the image, since the group being highlighted in the left pane is Everyone. At any time you can click on a group's name to view its assignment changes.
- For the Everyone group, FindMe is now assigned, and WholeOffice is unassigned.
- Search and filters—You can use search and filters to find applications when the application you want to assign is not visible.
- Reverse view—If you prefer to see applications in the left pane and users in the right pane, click Assign Apps to Groups.
- Number of applications indicator—When you assign an application in the right pane to a selected group, a green box appears next to the group name, indicating the number of applications assigned to the group. If you unassign an application, a red box appears with a number indicating the number of applications that you are unassigning.
-
Bulk application assignment
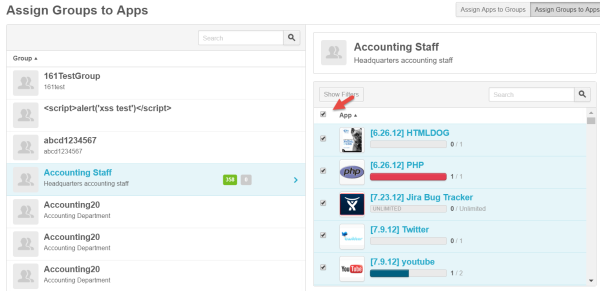
To assign or unassign all applications, click the checkbox next to App (see the red arrow in the following image).
Note the following in the preceding image:
- All available applications are assigned to the group. In the left pane, the number in the green square indicates the number of new applications assigned to this group.
- The applications that are not visible in the right pane are selected for assignment to the group and can be viewed by scrolling down. Note that this new select-all feature is only available when infinite scrolling is enabled—that is, if there are less than 100 groups in the current view. In a company with 100 or more groups, if a filter is applied that results in less than 100 groups being displayed, infinite scrolling is automatically enabled.
- The select-all checkbox can also be used for bulk unassignment of applications. For example, when a group has existing application assignments, clicking App in the applications pane unassigns all applications from that group.
- Although it's not the case in this example, applications can appear dimmed and therefore unavailable for several reasons, including being suspended or requiring a subscription update. When this occurs, the unavailable applications are not included in the application assignment.
- When all applications are assigned or unassigned to a group in this manner, it is still possible to deselect or select applications as needed by clicking individual application checkboxes.
- It is also also possible to assign all groups to an application in a single step by reversing the view. Click Assign Apps to Groups to display applications on the left and groups on the right, then enter a checkmark next to App. All groups are now assigned the application.
- See the comments related to the image in Individual application assignment for a description of other elements that may apply.
-
-
Click Next. The Confirm & Submit page opens, where you can review the changes you are making.
📝Note: In some cases, additional information must be collected prior to confirmation of the application assignment. For example, you may need to enter your user name, title, department, or any other information required by the product developer. If this occurs, enter the information, then click Next.
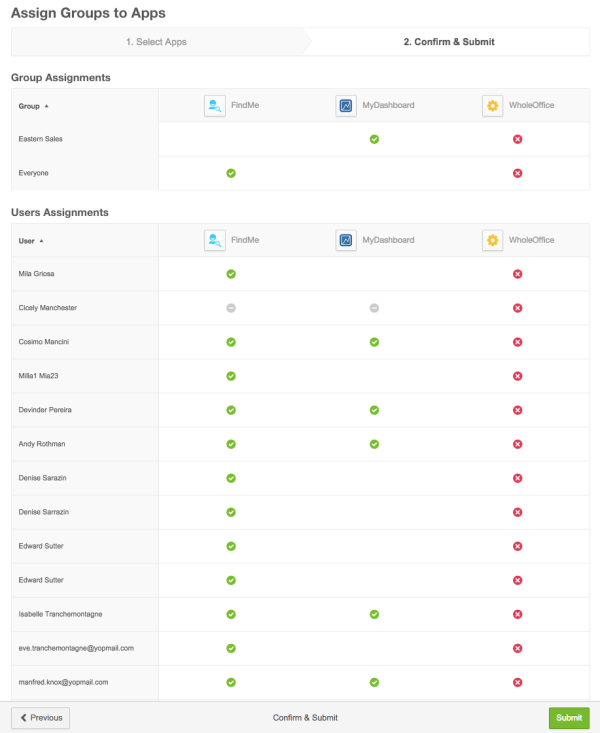
The Confirm & Submit page opens. The Confirm & Submit page displays information about the group assignments you are making, as shown in the following image.

Note the following in the preceding image:
- Confirmation of group assignment—The group assignment changes appear at the top. Eastern Sales is now assigned MyDashboard, and WholeOffice is unassigned from this group. FindMe is now assigned to the Everyone group, and WholeOffice is unassigned from this group.
- Confirmation of user assignment—The User Assignments section shows all of the users affected by the new application assignments. A column for each application displays changes for users.
- A green checkmark indicates a new application assignment.
- A red X means an application is unassigned.
- The gray icon for FindMe and MyDashboard on the row with Cicely Manchester's name indicates that those applications are already assigned to her, so there is no change for her.
-
Click Submit. You are returned to the Assign Groups to Apps page, and a notification message appears, confirming that your changes have been made.
📝Note: After you assign an application to a group, every user that is subsequently added to the group is automatically assigned the application, and they have access to it immediately upon activating their account.
⛔ Caution: There are circumstances in which an application assignment may remain in a pending state after the application is assigned. See Manage pending application assignments to learn more.
Was this page helpful?
Tell us more…
Help us improve our content. Responses are anonymous.
Thanks
We appreciate your feedback!