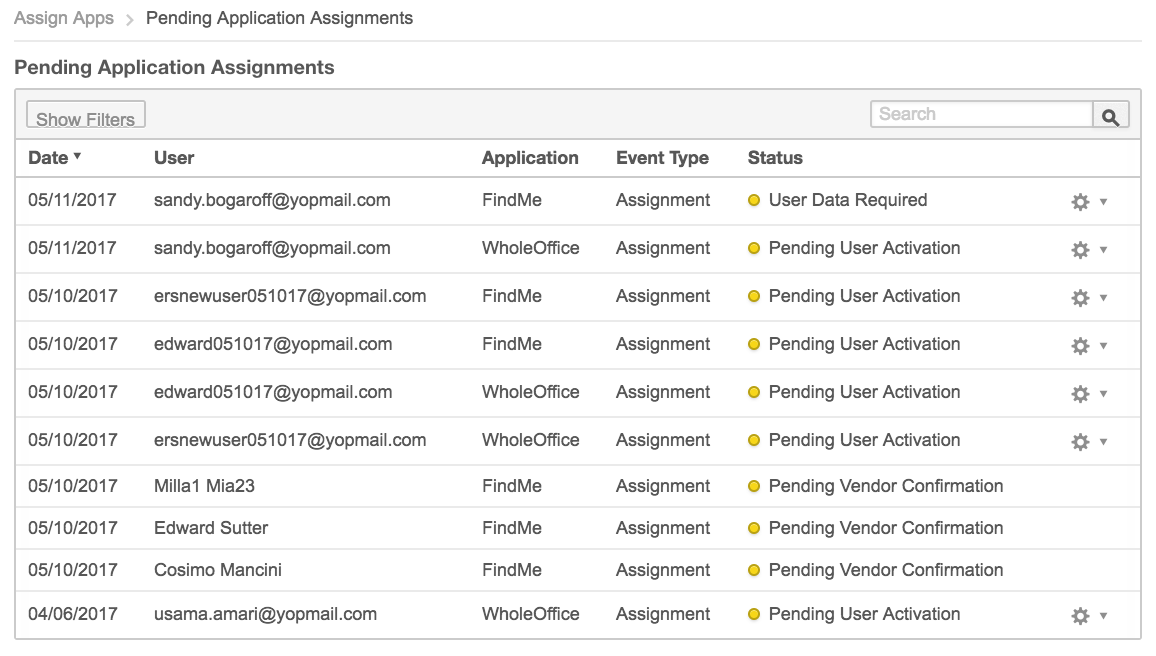
Manage pending application assignments
It is possible for application assignments to enter a pending state after the user has been assigned an application. The Pending Applications Assignment page displays all current pending assignments for your company. Pending statuses include:
- Pending User Activation
- User Data Required
- Pending Vendor Confirmation
- Insufficient Seat Availability
The following procedure describes how to determine if there are pending application assignments.
To manage pending application assignments
- Go to Manage > Account > Assign Apps. If there are pending application assignments, a message containing a link to the Pending Application Assignments page appears at the top of the page.
- Click the link contained in the message. This opens the Pending Application Assignments page, where you can see a list of all pending assignments. When a pending status is resolved using one of the actions described in the next step and the application assignment is confirmed, the user no longer appears on this page.

- Review the application statuses. Following is a description of each pending status type and actions you can perform, where applicable:
- Pending User Activation—A user was invited to the marketplace and you assigned them applications (whether individually, or to a group in which they are a member), but the user has not yet activated their account. You can wait for the user to activate their account or cancel the assignment by clicking the gear icon, then Cancel Assignment. After the user activates their account, their assignment is processed and no longer pending, unless any of the other requirements identified here have not yet been met (that is, user data required or pending vendor confirmation).
- User Data Required—If the developer of the application requires that additional information be provided as part of the application assignment (such as the user's title or department), the status is set at User Data Required. Additional data can be entered using the following procedure.
- Click the gear icon, then click Enter Data. A dialog opens.
- Enter the requested information, then click Save. The application is assigned and no longer pending, unless any of the other requirements (user activation or pending vendor confirmation) have not yet been met.
- You can also cancel the assignment. Click the gear icon, then select Cancel Assignment from the drop-down list. The assignment is immediately canceled, and a message notifies you that the user is successfully removed.
- Insufficient Seat Availability—If the user is assigned to an application with an insufficient number of seats, this status appears. When this occurs, you can perform one of the following actions:
- Update Subscription—You can add more seats by updating the subscription. See Update or cancel subscriptions to learn how. You must add enough seats to cover all pending assignments for this application. If you add an insufficient number of seats, a message appears, advising you that you are adding fewer seats than required. If this occurs, add more seats using the same process, or remove users assigned to this application.
- Unassign Users—You can free up seats for new users by unassigning the application from existing users. See Assign applications to users to learn how. After you unassign a sufficient number of seats, go to the Pending Application Assignments page, as described in step 1, to complete the user's assignment. Click the gear icon in the user's row, then select Apply Licence from the drop-down list (the number of available seats appears next to Apply Licence).
- Cancel Assignment—You can cancel the assignment. Click the gear icon, then select Cancel Assignment from the drop-down list. The assignment is immediately canceled, and you receive a message that the user is successfully removed.
- Apply Licence—Seats may become available between the time you assigned the application and the time when you review pending application assignments. For example, some users may have left the company and their seats are now available. You can assign those seats to pending users. On the Manage Pending Assignments page, click the gear icon in the pending user's row, then select Apply Licence from the drop-down list (the number of available seats appears next to Apply Licence).
- Pending Vendor Confirmation—In some cases the developer must confirm the application assignment. In these cases, when the application is automatically assigned to the new user, the developer receives a request to create the account in their system. Until the developer responds, the status remains as Pending Vendor Confirmation. Note that there are no actions that you can take regarding this status. Contact your support representative if the assignment remains pending for more than 48 hours.
Was this page helpful?
Tell us more…
Help us improve our content. Responses are anonymous.
Thanks
We appreciate your feedback!