Assign applications to users
This topic describes the procedure for assigning applications to users for marketplaces using the current version of the Assign Apps to Users functionality. All new marketplaces have this version by default. The primary difference between this version and the legacy version is that the current version provides greater detail when assigning applications to users. Additionally, for marketplaces with this version, the Company Administrator has the ability to assign or unassign all available applications to a user, or assign all users to an application, in a single step.
Marketplaces with the legacy version can contact their AppDirect account representative to request the latest version for their marketplace.
📝 Note: If the product that you assign is an Azure product, after you assign it to users in the marketplace UI, they are designated as contributors on the Microsoft Azure portal (on the Role Assignments tab in the Access Control panel).
To assign applications to users
-
Go to one of the following locations:
- Manage > Account > Assign Apps > Assign Apps to Users.
- Manage > Account > Applications > Manage > Assign Users > Assign Apps to Users
The Assign Users to Apps page opens, with a list of company users in the left pane, and available applications in the right pane. Clicking any user name displays the applications currently assigned to that user.
💡 Tip: You can reverse the view by clicking Assign Apps to Users. If you choose this option, in the following steps, select an application in the left pane, then assign it to users in the right pane.
-
Click the name of the user to whom you want to assign one or more applications. The list of applications appears on the right. currently assigned to them appears on the right. A color-coded assignment progress bar lets you know if seats are available.
-
To assign applications to users, you have two options. You can assign individual applications to a user, or you can assign applications in bulk—that is, you can assign or unassign all available applications in a single step.
- Individual application assignment
Click the applications you want to assign to the user, and clear applications you want to unassign. Repeat with other users as required.
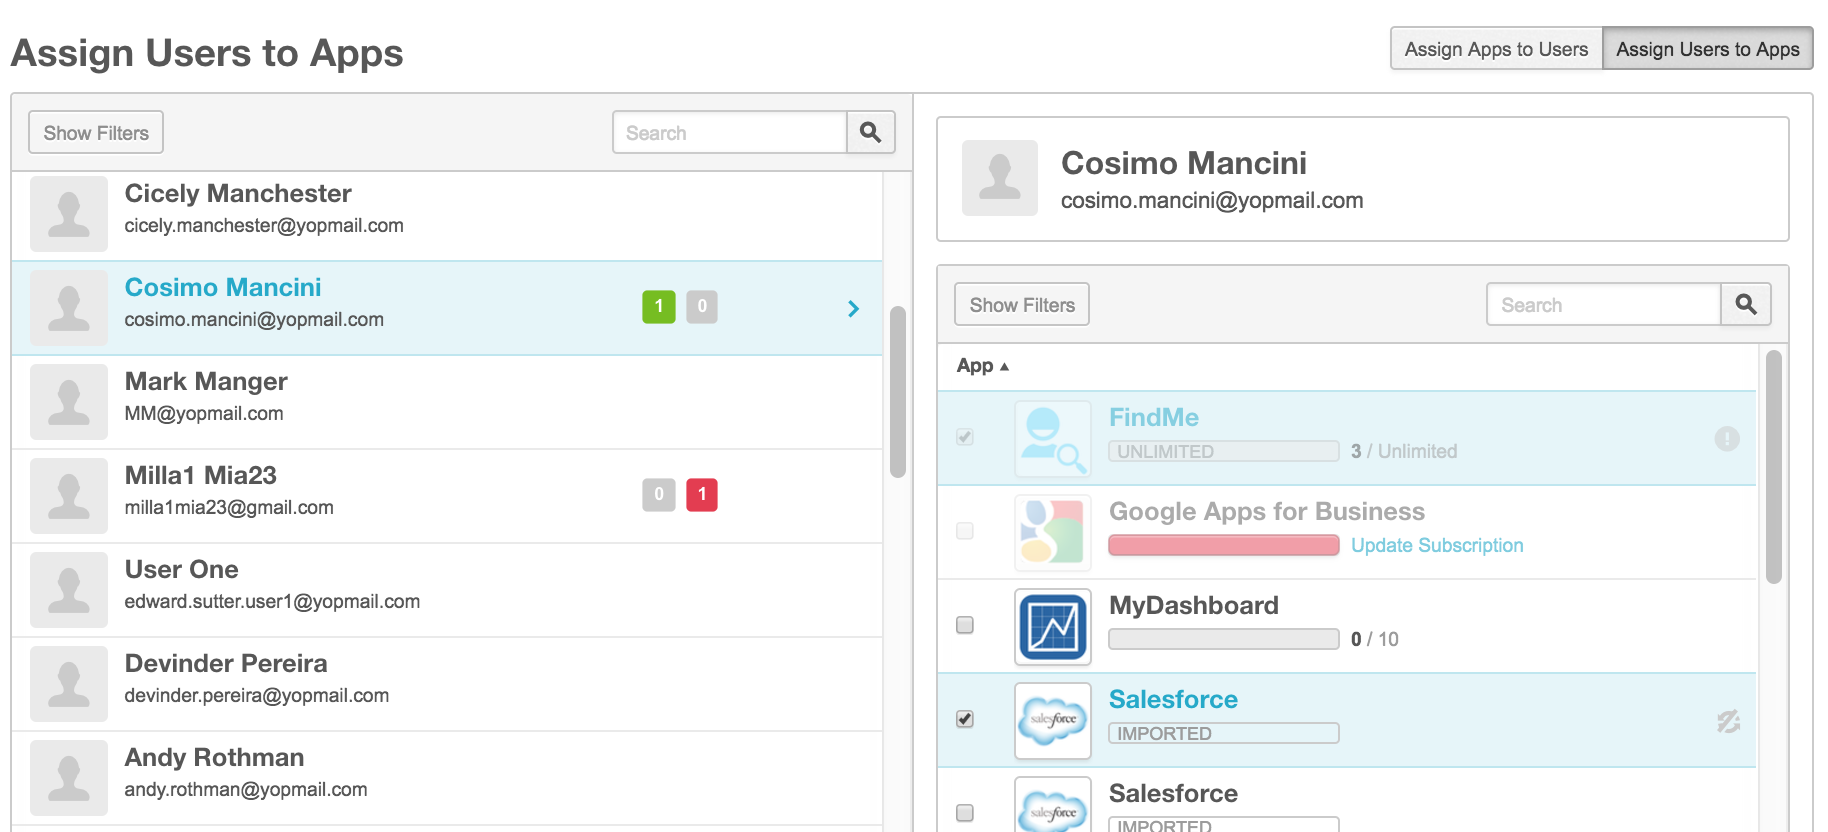
 Note the following in the preceding image:
- Existing application assignments—Applications that are already assigned to users have a checkmark.
- Available applications—Applications with no checkmark are available and can be assigned to users.
- Unavailable applications—Applications that remain dimmed when you hover over them typically require an update and are unavailable to assign to users.
- Number of applications indicator—When you assign an application to a selected user, a green box appears next to the user name, indicating the number of applications you are assigning to them during this session. If you unassign an application, a red box appears with a number indicating the number of applications that you are unassigning. In the preceding image, one user is being assigned a new application and another user is being unassigned from an application.
- Available seats indicator—Each application displays a color-coded assignment progress bar and a numeric representation of the assigned and available seats for the application. If the bar is red, and the numbers match (4/4 or 1/1, for example), there are no seats to assign for that product. If the status bar is gray and the numbers do not match (1/4 or 3/6, for example), there are remaining seats that can be assigned. If seats are available, after you assign the application to a user, the number of assigned users increases by one. If no additional seats are available, you may be able to update the subscription, allowing you to add more seats. See Update or cancel subscriptions to learn more.
- Application requires update—Sometimes an application appears dimmed, with a red bar and the update link turned on. This indicates that the subscription requires an update. There could be several reasons for this, including requiring additional seats in order to assign more users. You can click Update Subscription to go through the update subscription flow.
- Manage multiple users within a session—After you manage application assignments for one user, you can click another user's name and manage assignments for them. At any time you can click on a user's name to view their assignment changes.
- Search and filters—You can use search and filters to find users or applications that are not visible in the left or right pane.
- Reverse view—If you prefer to see applications in the left pane and users in the right pane, click Assign Apps to Users. The procedure described here is identical, but in reverse.
- Pending user status—If users in the list have a pending status, it means they have not yet activated their account. Applications can be assigned to users whose status is pending, and their access to the assigned applications will be effective immediately when they activate their account.
- Bulk application assignment
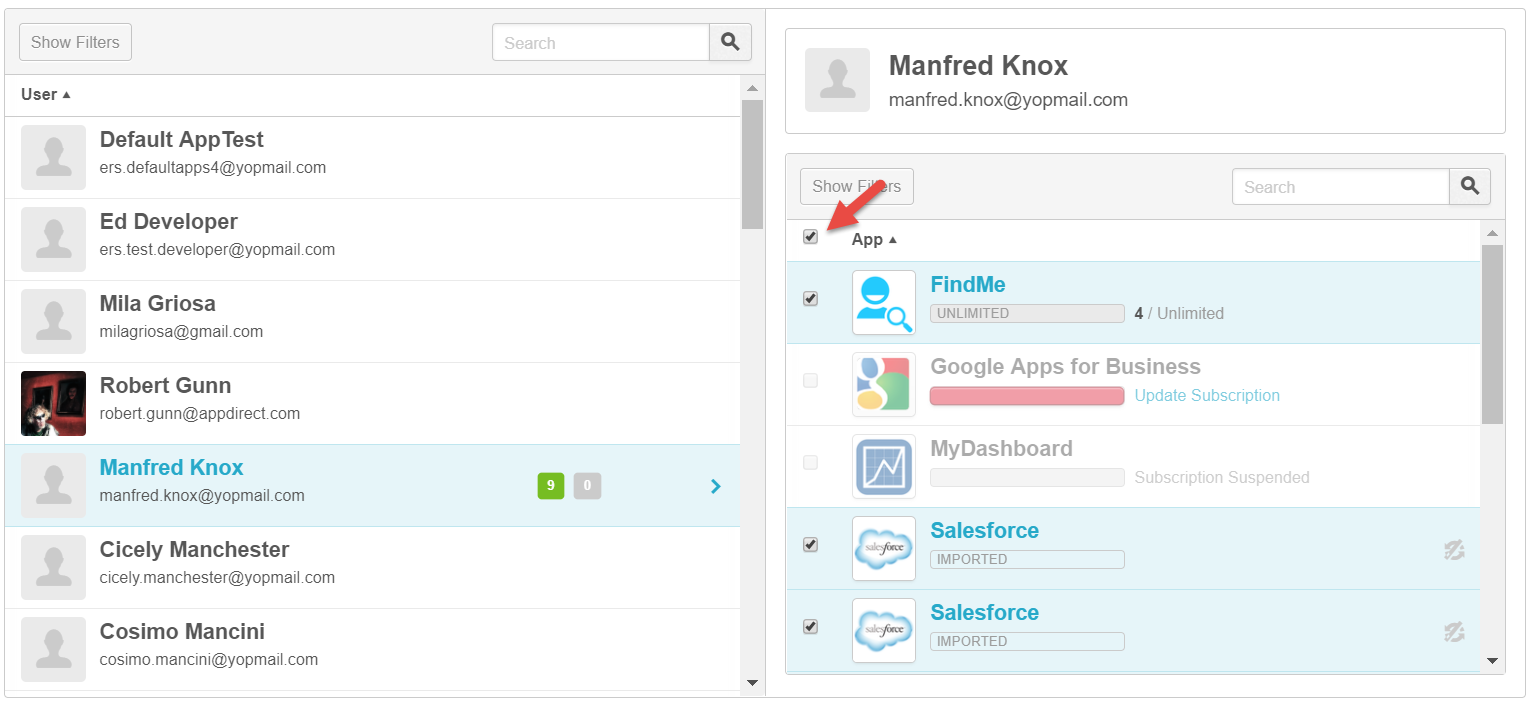
To assign or unassign all applications, click the checkbox next to App (see the red arrow in the following image). Note that applications can appear dimmed and therefore unavailable for several reasons, including being suspended or requiring a subscription update, as is the case for the unavailable applications in the example.
 Note the following in the preceding image:
- Applications that appear dimmed and therefore not available are not included in the application assignment.
- In the left pane, the number in the green square indicates the number of new applications assigned to this user.
- The applications that are not visible in the right pane are selected for assignment to the user and can be viewed by scrolling down. Note that this new select-all feature is only available when infinite scrolling is enabled—that is, if there are less than 1000 users or 100 groups in the current view. In a company with 1,000 or more users, if a filter is applied that results in less than 1000 users being displayed, infinite scrolling is automatically enabled.
- See the comments related to the image in Individual application assignment for a description of other elements that may apply.
When all applications are assigned or unassigned to a user in this manner, it is still possible to deselect or select applications as needed by clicking individual application checkboxes.
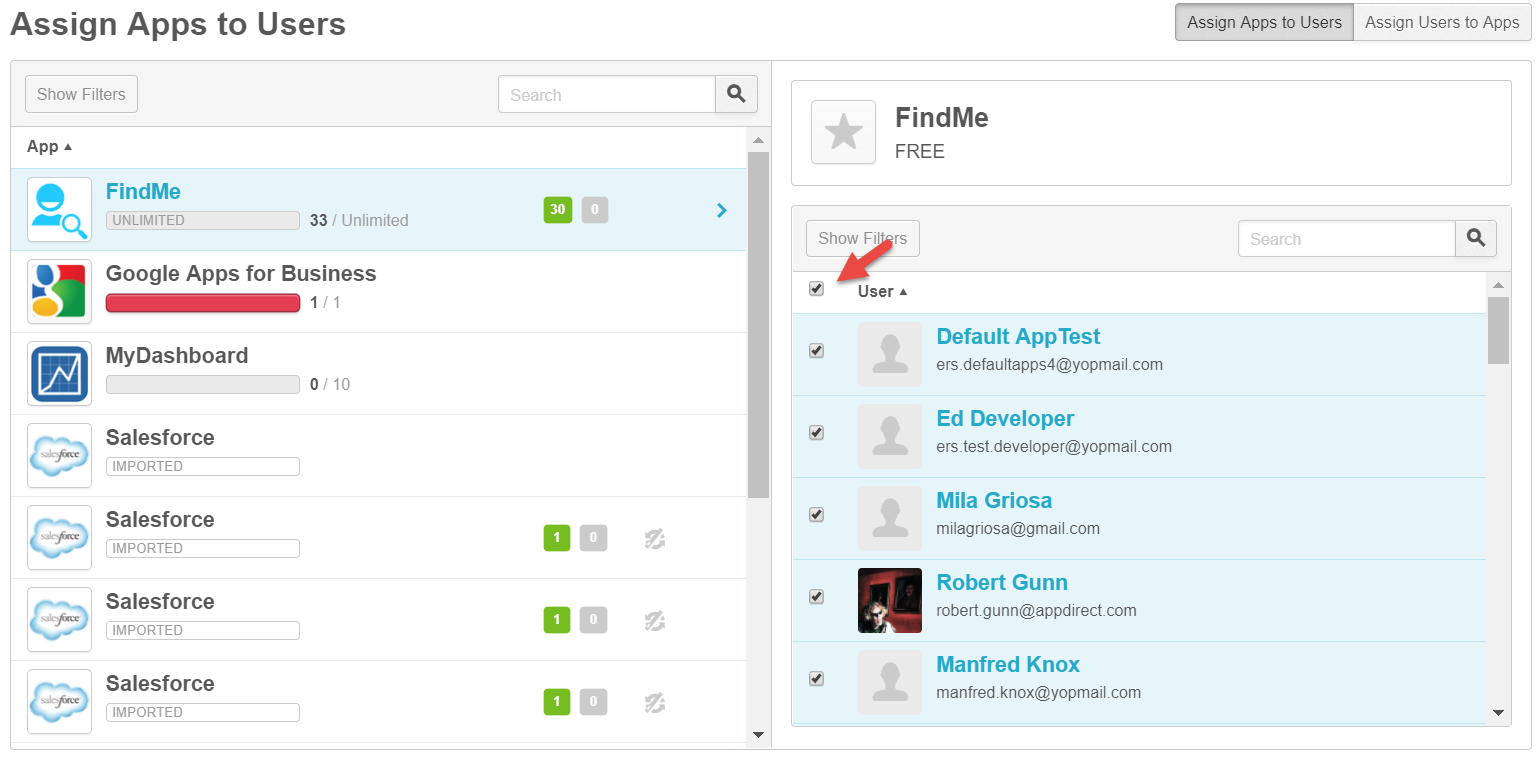
Similarly, it is also possible to assign all users to an application in a single step on the Assign Apps to Users page, as shown in the following image. In this example, the Company Administrator has assigned FindMe to 30 users.
 The select-all checkbox can also be used for bulk unassignment of applications. For example, when a user has existing application assignments, clicking App in the applications pane unassigns all applications from that user.
📝 Note: If the Assign Apps to Users page has a different appearance than what you see in the preceding image, your marketplace may have the legacy version of this functionality. For more information and to learn how to configure the legacy version, see Assign Applications to users (Legacy). If you have the legacy version, you can request the latest version by contacting your AppDirect account representative.
- Individual application assignment
-
Click Next. The Confirm & Submit page opens, where you can review the application assignment changes you are making during this session.
-
Click Submit. You are returned to the Assign Users to Apps page, where a message advises you that your assignments have been successfully updated.
💡 Tip: To add users that are not on the list, click Add More Users and enter individual email addresses, or upload an email list, then click Send Invitations. After new users activate their account, their names appear in the list of users.
📝 Note: There are circumstances in which an application assignment may remain in a pending state after the application is assigned. See Manage pending application assignments to learn more.
⛔ Caution: If a product was created as a single-user product, it is not visible under Manage > Account > Assign Apps. As a result, a Company Administrator cannot assign the application to another user. This is because single-user products are purchased directly by users who have the required permission to purchase products from a marketplace. However, a Company Administrator can cancel a user's subscription to a single-user product in the Manage Apps area of the user interface. Note that if the Company Administrator needs to cancel the subscription and remove the user, the subscription must be canceled first, then the user can be removed.
Was this page helpful?
Tell us more…
Help us improve our content. Responses are anonymous.
Thanks
We appreciate your feedback!