Create and manage product groups
You can organize your marketplace’s products in groups that use categories and attributes to help customers locate products that best fit their business needs. Groups and categories appear in various places on your marketplace as navigation links, search filters, product profiles, and in promotional devices like product sliders.
This section describes the different group types, and provides examples to help you plan your product organization.
The main grouping tools you can use to organize your product offerings include:
- Categories and subcategories—Provides two organizational levels for grouping products. For example, you can create a Sales and Marketing category, with separate Email Marketing and Customer Relationship Management subcategories.
- Attributes—Organizes products using the inherent characteristics of a product. Defined with an attribute group title and any number of attribute tags. For example, you can create an Operating System attribute group with iOS and Android tags.
📝 Note: If the AppDirect logo appears in the upper-left corner of the page, when Manage > Marketplace appears in this topic, click the grid icon > Switch to | Store, instead.
The following images show examples of configured categories and attributes on the two main marketplace pages.
Example of categories
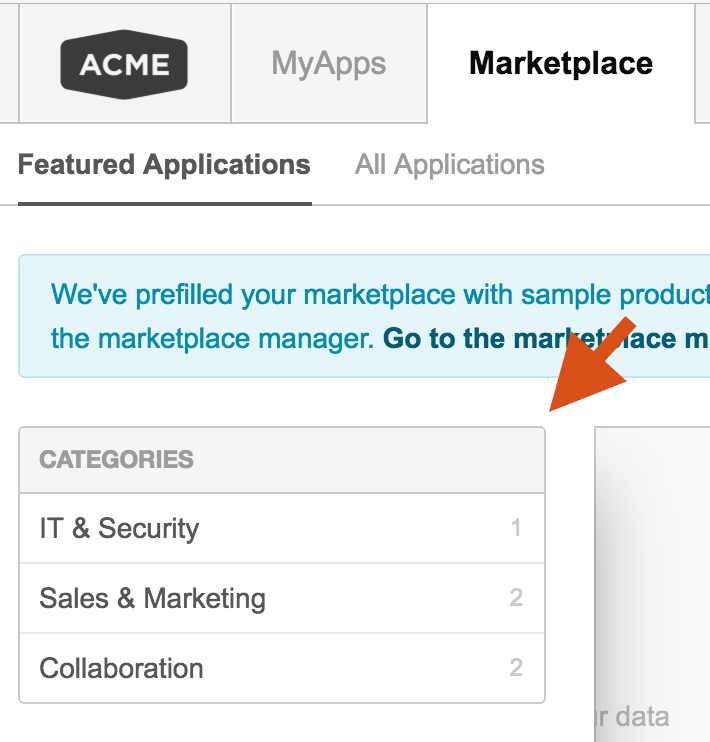
An example of categories appears below.
Marketplace > Featured Applications:

Note the following in the image:
- There are three predefined categories.
- There are no subcategories displayed. You must click the main category to display the associated subcategories.
- The are five predefined products: one in the IT & Security category, and two in each of the others.
- The category names are links that display the products tagged with that category.
Example of attributes
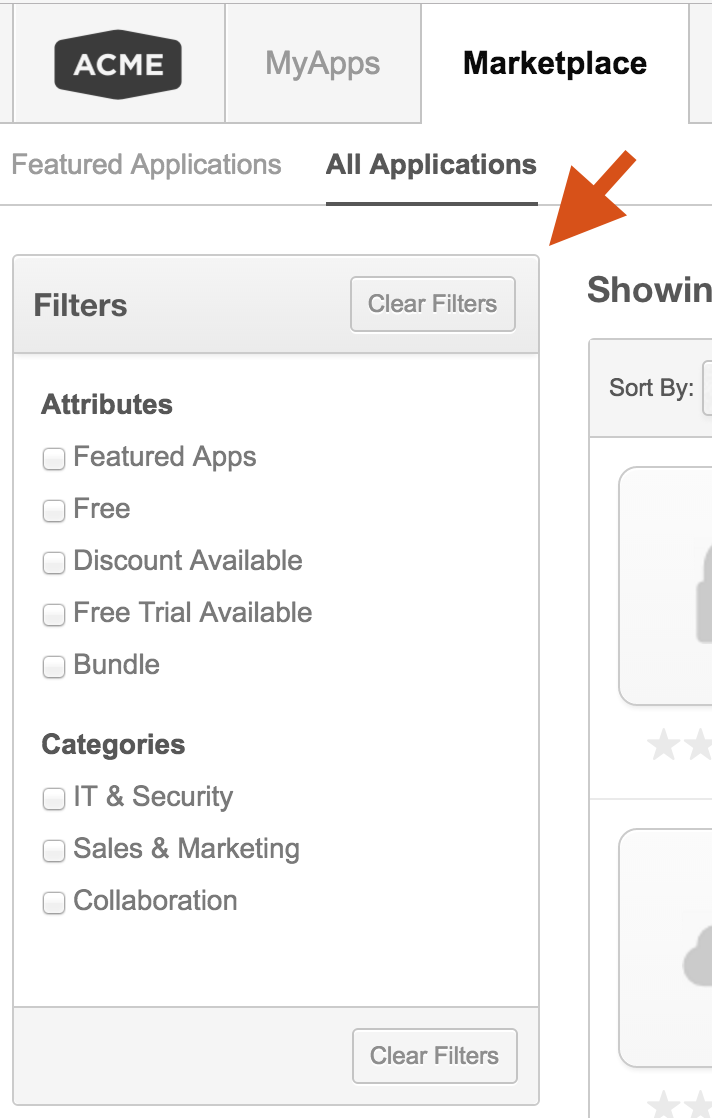
An example of attributes appears below.
Marketplace > All Applications:

Note the following in the image:
- There are five predefined attributes.
- The same three predefined categories appear. All predefined and user-defined categories appear on both pages.
- There are no subcategories displayed. You must click the main category to display the associated subcategories if they exist.
- By default, all checkboxes are clear, so all applications appear.
Select a checkbox to display only the products that are assigned the selected attribute, or are tagged with the selected category. You can select any combination of checkboxes to filter the product catalog.
To create a category
- Click Manage > Marketplace > Products > GROUPS | Product Groups. The Product Group page opens and displays the configured categories.
- Click Add Category. The Add Category dialog appears.
- Enter the category name in the Category Name field.
- (Optional) Click Add Subcategory, then enter a subcategory in the Subcategories field that appears. Repeat as required.
- (Optional) Click Show Advanced Settings. Three options appear as shown in the previous image. Click the toggle to edit one or more of the options.
- Display on the marketplace homepage—Determines whether the category is visible on the marketplace homepage.
- Only Marketplace Managers can tag products with this category—Defines the category as one to which only Marketplace Managers can assign products.
- Use image badge—Displays an upload field where you can choose a PNG image file that is displayed for all products added to this category. The image appears as a small icon below or next to the product logo on the Featured Applications or All Applications views of the marketplace home page respectively. It also appears in search results pages.
- Click Save to create the category and subcategories. The category you created appears in the left navigation pane on the marketplace’s All Applications and the Featured Applications pages.
To add a product to a category
- Click Manage > Marketplace > Products > CATALOG | Production Catalog. The Production Catalog opens.
- Click the gear icon next to the product that you want to add to a category, then select Edit Marketplace Settings from the list. The productName Settings page appears.
- Click Product. The Product tab content appears.
- Under the Attributes section, select the checkbox next to each product attribute (tag) that you want to assign to the product, then select the category and subcategory to which you want to add the product.
- Click Save.
The product appears in the left navigation pane on the marketplace’s All Applications and the Featured Applications pages. You can edit the order of categories and attributes as described in the next section.
Edit the display order of categories and attributes
Over time as your marketplace grows, you might need to reorder categories, subcategories, attributes, and sub-attributes on the marketplace homepage. Marketplace Managers can rearrange and customize the panes to enhance the marketplace experience for customers.
To rearrange categories and attributes
-
Go to Manage > Marketplace > Settings > SETTINGS| General Settings > Edit storefront layout. The marketplace homepage opens in the layout editor.
-
Hover over the Attributes pane to highlight the area.
📝 Note: When you hover over a pane, the header displays the pane type, such as Categories or Attributes.
-
Click and hold the reposition icon next to the Attributes header and drag it above or below a different pane.
The other panes move to accommodate its new position.
After you release the attributes pane, you can rearrange the sub-attributes within that same pane. -
Click Edit. Each sub-attribute row includes a reposition icon.
-
Click and hold the reposition iconin the row of the sub-attribute and drag it higher or lower in the pane, similar to step 3.
-
Click Save.
-
(Optional) Click Preview Changes at the top of the layout editor to view the changes.
-
Click Save and Publish to publish your marketplace with the newly arranged attributes pane and sub-attributes.
Was this page helpful?
Tell us more…
Help us improve our content. Responses are anonymous.
Thanks
We appreciate your feedback!