Configure invoice and credit memo headers and content
When the Invoice & Credit Memo menu item appears at Manage > Reseller > Settings > Billing settings, Resellers can define header and content settings for invoices and credit memos.
The Invoice & Credit Memo page includes separate configuration areas for each document type:
- Invoice — Seller details, logo, and memo.
- Credit memo — Seller details, logo, and memo.
Marketplace Managers configure invoice and credit memo numbering prefixes on the marketplace Invoice & Credit Memo page (see Configure document numbering). Resellers see invoice and credit memo numbers that reflect the prefixes configured for the marketplace.
Invoice & Credit Memo settings apply to the following formats:
- Invoices — The customer invoice view in the user interface, and PDF invoices that users download when invoice templates reference the Invoice & Credit Memo invoice fields (see Invoice templates).
- Credit memos — The credit memo detail view and downloaded credit memo PDFs when credit memo templates reference the Invoice & Credit Memo credit memo fields.
You can configure invoice and credit memo seller details, logos, and memos independently.
Invoice header information
You can configure the following information that appears in the header on the first invoice page:
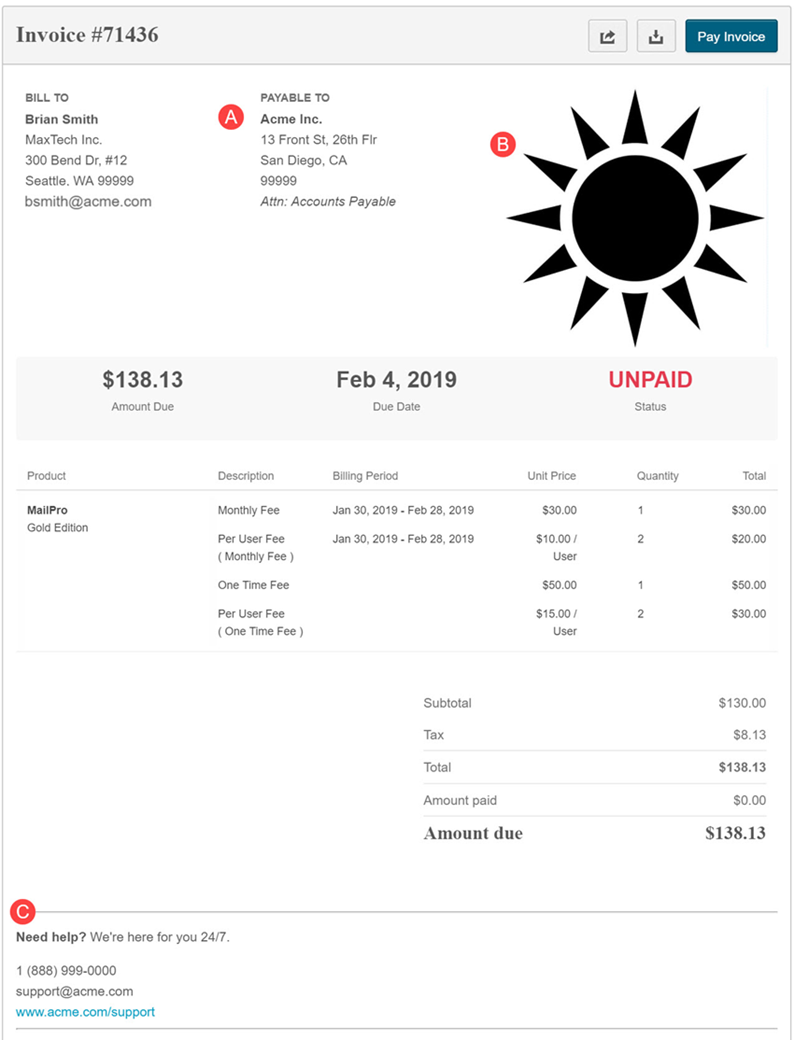
- Seller details—Text that populates the Payable To section on invoices (element A in the sample invoice image). You can format the seller details with Markdown, a markup language. A Markdown cheat sheet is available from the link that appears next to those fields.
- Logo—The image that appears in the invoice header (element B in the sample invoice image).
Invoice content
You can configure the following information:
- Memo—Text that populates the invoice footer (element C in the sample invoice image) that appears on the last invoice page. You can format the memo content with Markdown, a markup language. A Markdown cheat sheet is available from the link that appears next to those fields.
Credit memo header information
In the Credit memo section on the Invoice & Credit Memo page, you can configure the following header information for credit memos:
- Seller details—Text that populates the Payable To section on credit memos. You can format the seller details with Markdown. A Markdown cheat sheet is available from the link that appears next to those fields.
- Logo—The image that appears in the credit memo header.
Credit memo content
In the Credit memo section on the Invoice & Credit Memo page, you can configure the following:
- Memo—Text that populates the credit memo footer. You can format the memo content with Markdown. A Markdown cheat sheet is available from the link that appears next to those fields.
Configuration tests
To test invoice and credit memo configuration, log on with customer test accounts and view invoices and credit memos.
To configure invoice seller details
-
Go to Manage > Reseller > Settings > Billing settings | Invoice & Credit Memo. The Invoice & Credit Memo page opens.
-
In the Invoice section, next to Seller details, click Edit. Cancel and Save buttons appear. The Save button is available after you make a change in the Seller details field.
-
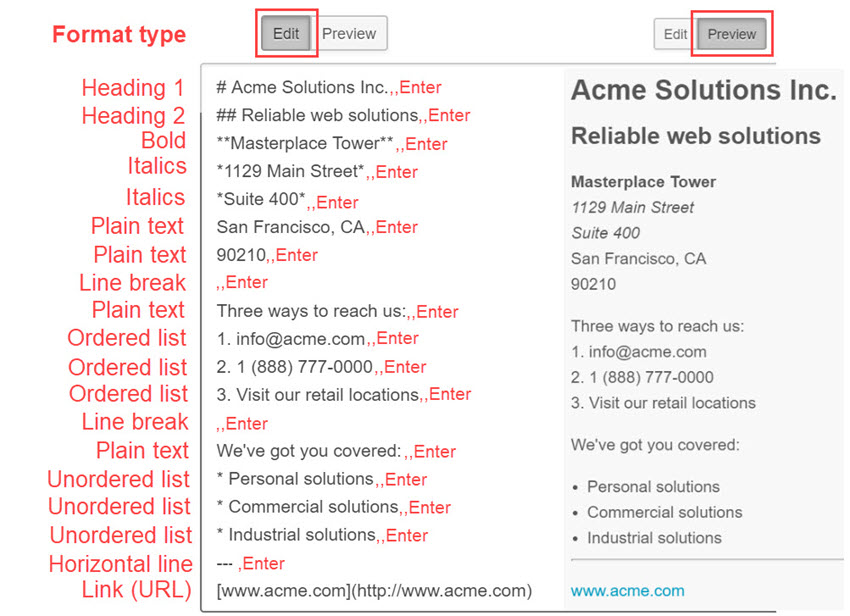
Click Show Markdown cheat sheet. The cheat sheet, with examples, appears. It shows how to apply the format named in the left column (for example, Heading 1, Heading 2, and bold), with Markdown syntax (for example, # and * characters) that you apply to text that you enter in the middle Edit pane column, to achieve the appearance shown in the right Preview pane column.
In the Edit pane column in the image, red commas indicate where you enter spaces, and 'Enter' indicates where you press Enter on the keyboard, to achieve line and paragraph breaks.
-
In Seller details, enter new or edit existing text and use Markdown to format it.
-
Next to Seller details, click Preview. The preview pane displays the formatted text that results from entries in the Edit pane.
-
Click Save.
-
(Optional) Click Hide Markdown cheat sheet. The cheat sheet closes and the link changes to Show Markdown cheat sheet, which you can click to access the cheat sheet again.
To configure invoice logos
- Go to Manage > Reseller > Settings > Billing settings | Invoice & Credit Memo. The Invoice & Credit Memo page opens.
- In the Invoice section, enter a URL, or edit the existing one, for an invoice logo. The URL must be for an image on a content file server such as an Amazon S3 file server, or one that you upload for an invoice template (see Invoice templates and Manage images). Test the output to confirm that the image you reference appears as you expect.
When you enter a new URL or edit an existing one, the Cancel and Save buttons appear. The Save button is available after you edit the Logo field.
Logos automatically resize to fit the invoice header. - Click Save.
To enable zero-amount invoice lines for restricted editions
- Go to Manage > Reseller > Settings > Billing settings | Invoice & Credit Memo. The Invoice & Credit Memo page opens.
- In the Invoice section, turn on Hide zero-amount restricted edition invoice lines.
- Click Save.
To configure invoice memos
- Go to Manage > Reseller > Settings > Billing settings | Invoice & Credit Memo. The Invoice & Credit Memo page opens.
- In the Invoice section, next to Memo, click Edit. Cancel and Save buttons appear. The Save button is available after you make a change in the Memo field.
- Click Show Markdown cheat sheet. The cheat sheet, with examples, appears. It shows how to apply the format named in the left column (for example, Heading 1, Heading 2, and bold), with Markdown syntax (for example, # and * characters) that you apply to text that you enter in the middle Edit pane column, to achieve the appearance shown in the right Preview pane column.
In the Edit pane column in the image, red commas indicate where you enter spaces, and 'Enter' indicates where you press Enter on the keyboard, to achieve line and paragraph breaks.
- In Memo, enter new or edit existing text and use Markdown to format it.
- Next to Memo, click Preview. The preview pane displays the formatted text that results from entries in the Edit pane.
- Click Save.
- (Optional) Click Hide Markdown cheat sheet. The cheat sheet closes and the link changes to Show Markdown cheat sheet, which you can click to access the cheat sheet again.
To configure credit memo seller details
- Go to Manage > Reseller > Settings > Billing settings | Invoice & Credit Memo. The Invoice & Credit Memo page opens.
- In the Credit memo section, next to Seller details, click Edit. Cancel and Save buttons appear. The Save button is available after you make a change in the Seller details field.
- Click Show Markdown cheat sheet. The cheat sheet, with examples, appears.
- In Seller details, enter new or edit existing text and use Markdown to format it.
- Next to Seller details, click Preview. The preview pane displays the formatted text that results from entries in the Edit pane.
- Click Save.
- (Optional) Click Hide Markdown cheat sheet.
To configure credit memo logos
- Go to Manage > Reseller > Settings > Billing settings | Invoice & Credit Memo. The Invoice & Credit Memo page opens.
- In the Credit memo section, enter a URL, or edit the existing one, for a credit memo logo. Test the output to confirm that the image you reference appears as you expect.
When you enter a new URL or edit an existing one, the Cancel and Save buttons appear. The Save button is available after you edit the Logo field.
Logos automatically resize to fit the credit memo header. - Click Save.
To configure credit memo memos
- Go to Manage > Reseller > Settings > Billing settings | Invoice & Credit Memo. The Invoice & Credit Memo page opens.
- In the Credit memo section, next to Memo, click Edit. Cancel and Save buttons appear. The Save button is available after you make a change in the Memo field.
- Click Show Markdown cheat sheet. The cheat sheet, with examples, appears.
- In Memo, enter new or edit existing text and use Markdown to format it.
- Next to Memo, click Preview. The preview pane displays the formatted text that results from entries in the Edit pane.
- Click Save.
- (Optional) Click Hide Markdown cheat sheet.
Was this page helpful?
Tell us more…
Help us improve our content. Responses are anonymous.
Thanks
We appreciate your feedback!