Organize your dashboard
❗ Important: The documentation in this topic refers to a feature or product that is currently in Early Availability status. Features in Early Availability status are only available in production to a limited number of customers based on fit with specific use cases. For more information about Early Availability status, see Product lifecycle phases. If you would like to use the product capabilities described here during the Early Availability phase, contact your AppDirect technical representative.
While the wide variety of data sources we offer is a key component of the AppInsights value proposition, the flexibility of our interface is equally important. We designed our tool to make it especially easy for you to intuitively design your dashboards, with decisions on layout, widget size, styling, etc. left entirely to your discretion. Read through the sections below to better understand how you can take full control over the visual structure of your dashboards.
Drag and drop interface—If you have experimented with the AppInsights app at all, you have probably noticed that widgets on your dashboards are highlighted with a light gray border whenever you hover over them with your mouse. Your cursor will also automatically change from a standard pointer to a “move” cursor, allowing you to freely re-position your widget to a different area of the dashboard.
As a standard user you will have a 24x12 dashboard grid to work with. If your dashboard is getting crowded and you attempt to move one of your widgets to an area of the dashboard that is already populated, the app will automatically snap your widget back to its original position so you can make more room.
To make more room on a crowded dashboard, you will need to resize your widgets. Similar to the process of moving your widgets, you will want to start by hovering over your widget of choice—this time, move your mouse to the bottom right corner of the widget until you see the resize pointer. Click and drag to your desired size (larger or smaller) and release to complete this change. If you attempt to resize the widget in a way that does not fit the grid, the app will automatically snap your widget to fit the nearest vertical and horizontal grid lines.
Please note that each widget has a minimum and maximum size. You can easily determine these min / max dimensions by experimenting within AppInsights or take a look at our widget technical specs for detailed info.
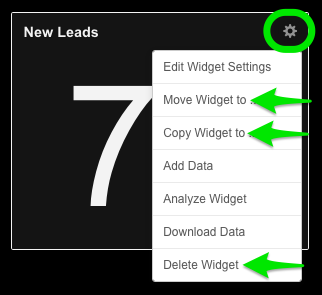
Copy, move, delete widgets—No matter how successful you are in first setting up your dashboards, there will surely be times when you decide that a widget belongs on a different dashboard (or dashboards) than you originally intended. Or you may decide that the widget you originally designed is no longer useful and must be deleted. To take either of these actions, simply hover over your widget and click the gray gear icon at the top right of the widget.
From this menu, you can choose to move or copy the widget to another one of your dashboards, or you may delete it entirely. Please note that once you delete your widget, the data it contains will not be saved. If you’d like to keep a record of your widget’s data history prior to deleting it, make sure to download the data to a CSV using the “Download Data” option (more on this functionality later).
Copy, clear, delete dashboards—Similar to individual widgets, you may decide that the contents of an entire dashboard are no longer needed and can be cleared or deleted altogether. Or perhaps you have designed a dashboard layout that you’d like to replicate or use as a template for another dashboard you will be building.
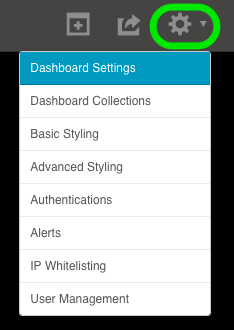
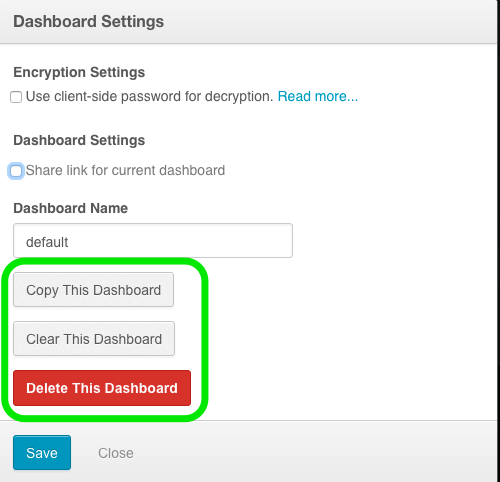
To copy, clear, or delete your dashboards, simply navigate to the primary AppInsights settings icon and select the “Dashboard Settings” menu. From there you can copy your current dashboard—copied dashboard names will default to the existing dashboard name with “- Copy” added—clear it, or delete it. Once again, data contained within deleted widgets will not be saved if your clear or delete your dashboard.
Transitioning between dashboards—Regardless of the dashboard plan you have chosen, our hope is that you take full advantage of the space made available across all of your dashboards. This means that you will be switching back and forth between your various dashboards quite frequently, particularly during the initial design / set-up phase.
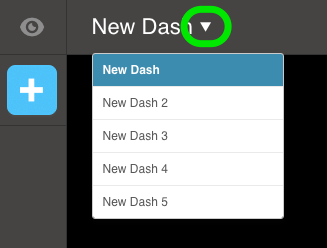
To transition between your dashboard, click the dropdown arrow pictured in the screenshot below and select which dashboard you’d like to view / edit. Even if you haven’t visited your selected dashboard in some time, the AppInsights app will continue to update the data and keep the widgets current in your absence.
Authentication management—With AppInsights, we hope to provide our users with a product that maintains its value for many years. As your business changes and, as a result, your goals, you may find that some of the data sources you were using initially are no longer relevant. Deleting your authentications for any out-of-the-box integration connections—or editing them if your credentials change—can be managed using our Authentication management menu.
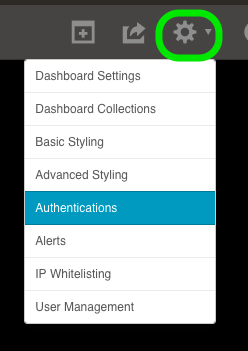
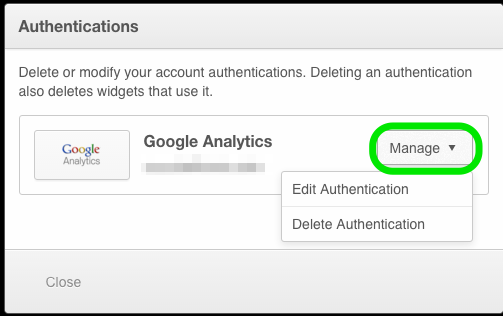
First, navigate to the primary AppInsights settings icon and select the “Authentications” menu. Next, choose which authentication you’d like to manage and whether you’d like to edit or delete the account. If you have multiple users on your AppInsights account, any authentication change you make will impact all users that are accessing the dashboards. Any active widgets connected to this authentication that are still on your dashboards will also be deleted.
Styling—There’s no element of your dashboards that is more important than the data you decide to surface, but it doesn’t hurt for them to look great! With this in mind, we offer two different methods for editing the look and feel of your dashboards.
For simple modifications like changing your background or adding your company logo, you will want to use our Basic Styling menu. If you’d like to make advanced changes—font, widget background color, adding borders, etc.—you can make stylistic class and property changes from our Advanced Styling menu using the CSS stylesheet language.
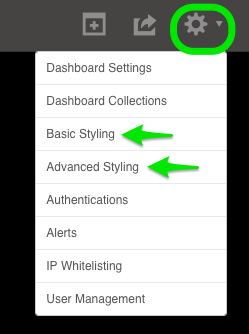
For thorough instructions on how to leverage each of these styling options, see the following topics:
Was this page helpful?
Tell us more…
Help us improve our content. Responses are anonymous.
Thanks
We appreciate your feedback!