Create product versions
Developers can create versions of a product for different platforms and for different device types within a platform. Product versions are required in the following situations:
- You need to create an updated version of the downloadable file (for example, for a bug fix, or to introduce a new feature).
- You want to expand the set of devices that your product supports—for example, Android tablets. The new product version has different compatibility attributes (for example, a new operating system version).
Note: Platforms define a set of devices using a list of attributes (for example, operating system). When you create a product version, you need to supply specific values for those attributes (such as the OS version, required connectivity, and so on), and a native piece of software that is compatible with those attribute values. This feature must be enabled by AppDirect. Contact your AppDirect representative for information.
To create a new product version
- Ensure that AppDirect has enabled and configured platforms for your marketplace.
- Go to Manage > Billing and Distribution > Products > {name of product} > Edit > Platforms & Versions > Platforms > {name of platform}. The Product Versions page opens, with a list of existing product versions. Each product version lists the version name, version code, status and when it was last updated.
- There are two ways to create a product version:
- Duplicate an existing version. Use this option when the new product has many of the same configurations as the existing one. This allows you to create a new product version more rapidly.
- Click the product version you want to duplicate, then click Duplicate. The Create Product Version page opens, with the details for the product you are duplicating already populated.
- Change only the details required to create the new product version, and upload the correct asset file for the new product version, then click Save. After the product is saved, you must request approval (see the last step, Request Approval, below).
- Create a new product version. Proceed to the next step to create a product version using this option.
- Duplicate an existing version. Use this option when the new product has many of the same configurations as the existing one. This allows you to create a new product version more rapidly.
- To create a new product version, click Add Product Version. The Product Version creation page opens. Note that the top section is incomplete, since the product is in draft form.
- Enter all required information in the Product Version Details pane, following these procedures:
- Title—Internal name used in the content management system for the Product Version. It allows the Marketplace Manager to quickly differentiate between product versions. This name is not visible to customers.
- Version Code—Used to determine whether one version is more recent than another. This must be a positive integer that is higher than the value entered for the previous product version. If left blank, the next incremental value is entered automatically when the product version is saved.
- Version Name—The product version name that is visible to users on their devices. Change the name that automatically appears in this field to something that is meaningful for customers. For example: Initial free version.
- File Asset—Click Choose File to upload the file that will be downloaded to the device. Each product version has its own asset file.
- Product version-specific fields—Enter required information in each of the remaining fields in the Product Version Details pane. When creating the platform, the Marketplace Manager defined the information that must be configured to create a product version. These can include text fields, checkboxes or drop-down lists. For example: Model, operating system, RAM, required connectivity, and others.
-
(Optional) To assign the product version to device groups for testing, in the Test Distributions section, select an environment, then select device groups for which you want to make the test distribution available.
Note: A device group comprises of a set of devices (each device has its own unique ID). Each device group is associated with at least one environment that specific vendors can access. Similarly, each environment can include multiple device groups. Device groups must be created for you by AppDirect. Contact your AppDirect technical representative to discuss details. Test distributions can only be assigned to a device group when a product version is in draft, pending approval or rejected state. After a product version is published, you cannot change or remove the test distribution, but you can view the device groups and environments associated with it.
-
Click Save. A notification appears, confirming that the product version has been saved. The notification also provides a link to the Manage Platforms page. You can make further edits if required at this stage, then click Save again.
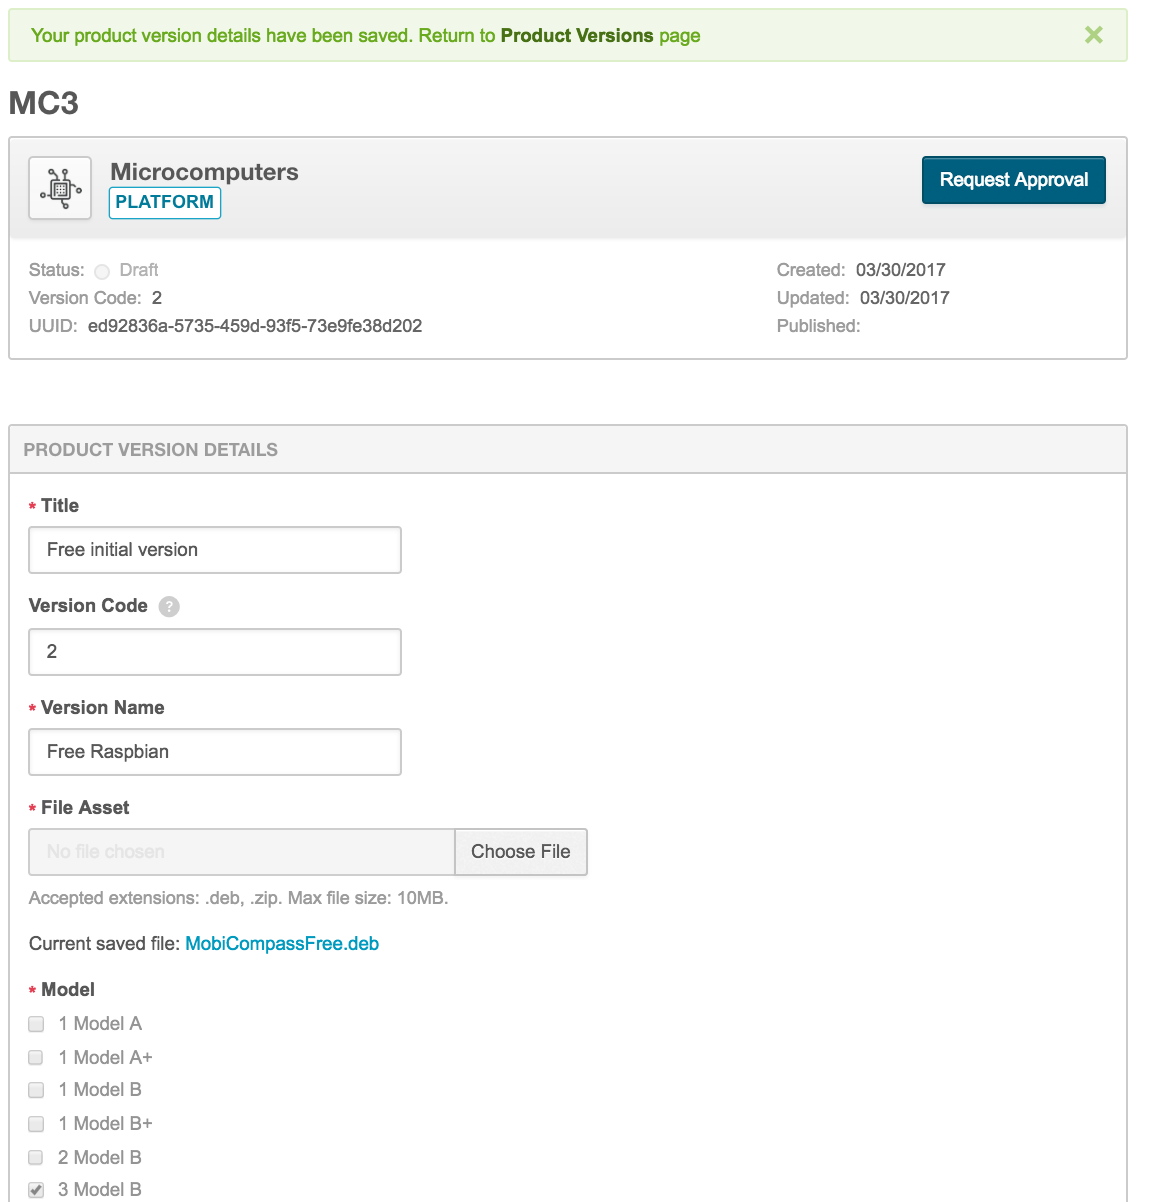
- Click Request Approval. This notifies the Marketplace Manager that the product version is ready for their approval. Only a Marketplace Manager can approve and publish product versions.
- After you click Request Approval, you are returned to the Product Versions details page, where you can take other actions to manage product versions. A notification confirms that the approval request has been sent. The notification includes a link to the Manage Platforms page.
After the Marketplace Manager completes their review of the product version, a message on the Product Version Details page notifies you of the result of your request (success or fail), with a link to view additional details
-
Click the link to view additional details. The Package Validation Details page opens. The reason for the success or failure of your request appears in the additional details pane.
-
If the request is denied, you have the option to make the required changes using the procedures previously described, then click Request Approval again. A notification confirms that the approval request has been sent. The notification includes a link to the Manage Platforms page.